# Zentao 禅道 快速入门
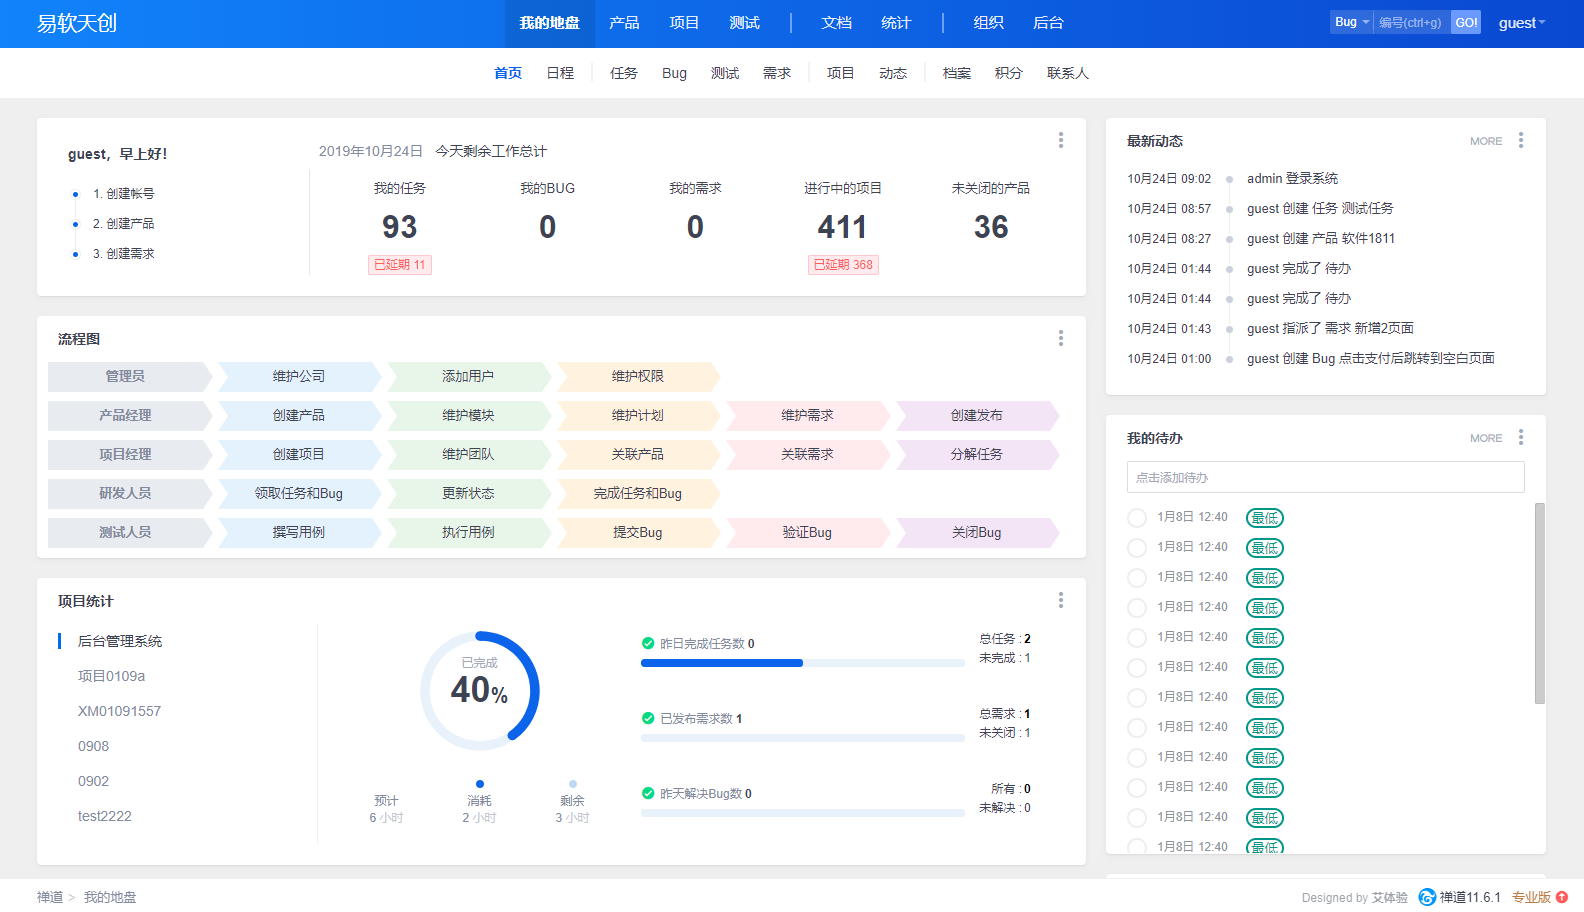 ### 准备[](https://support.websoft9.com/docs/zentao#%E5%87%86%E5%A4%87)
部署 创达睿通 提供的 ZenTao 之后,请参考下面的步骤快速入门。
1. 在云控制台获取您的 **服务器公网 IP 地址**
2. 在云控制台安全组中,检查 **Inbound(入)规则** 下的 **TCP:80** 端口是否开启
3. 在服务器中查看 ZenTao 的 **默认账号和密码**
4. 若想用域名访问 ZenTao,务必先完成\*\*域名五步设置\*\* 过程
### ZenTao 初始化向导[](https://support.websoft9.com/docs/zentao#zentao-%E5%88%9D%E5%A7%8B%E5%8C%96%E5%90%91%E5%AF%BC)
#### 详细步骤[](https://support.websoft9.com/docs/zentao#%E8%AF%A6%E7%BB%86%E6%AD%A5%E9%AA%A4)
1. 使用本地浏览器访问网址: ** 或 **, 就进入引导首页
2. 根据系统提示,选择语言,然后“开始安装”
### 准备[](https://support.websoft9.com/docs/zentao#%E5%87%86%E5%A4%87)
部署 创达睿通 提供的 ZenTao 之后,请参考下面的步骤快速入门。
1. 在云控制台获取您的 **服务器公网 IP 地址**
2. 在云控制台安全组中,检查 **Inbound(入)规则** 下的 **TCP:80** 端口是否开启
3. 在服务器中查看 ZenTao 的 **默认账号和密码**
4. 若想用域名访问 ZenTao,务必先完成\*\*域名五步设置\*\* 过程
### ZenTao 初始化向导[](https://support.websoft9.com/docs/zentao#zentao-%E5%88%9D%E5%A7%8B%E5%8C%96%E5%90%91%E5%AF%BC)
#### 详细步骤[](https://support.websoft9.com/docs/zentao#%E8%AF%A6%E7%BB%86%E6%AD%A5%E9%AA%A4)
1. 使用本地浏览器访问网址: ** 或 **, 就进入引导首页
2. 根据系统提示,选择语言,然后“开始安装”
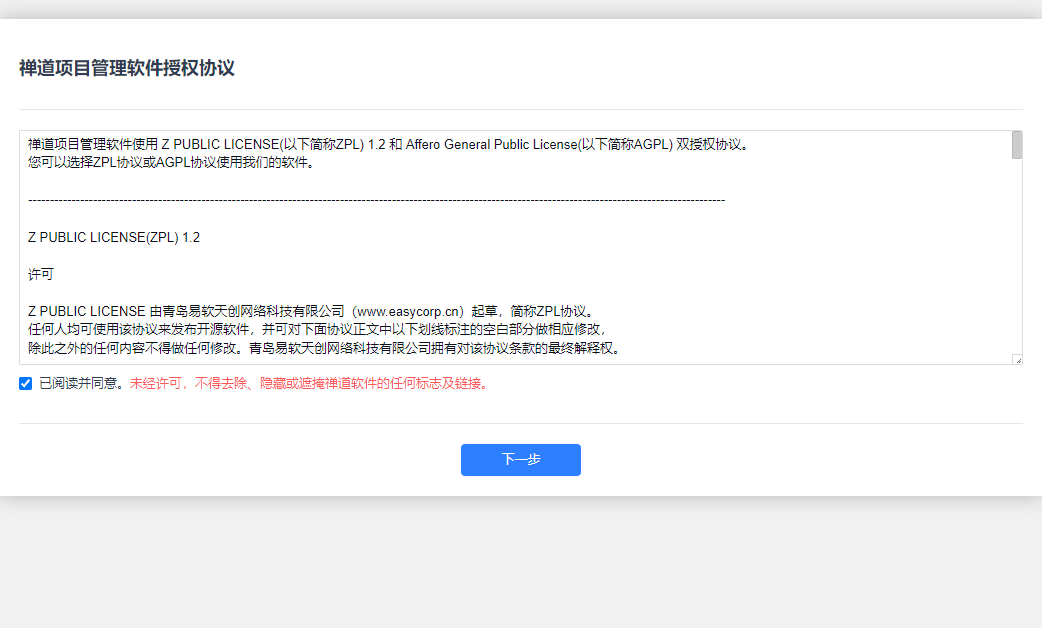
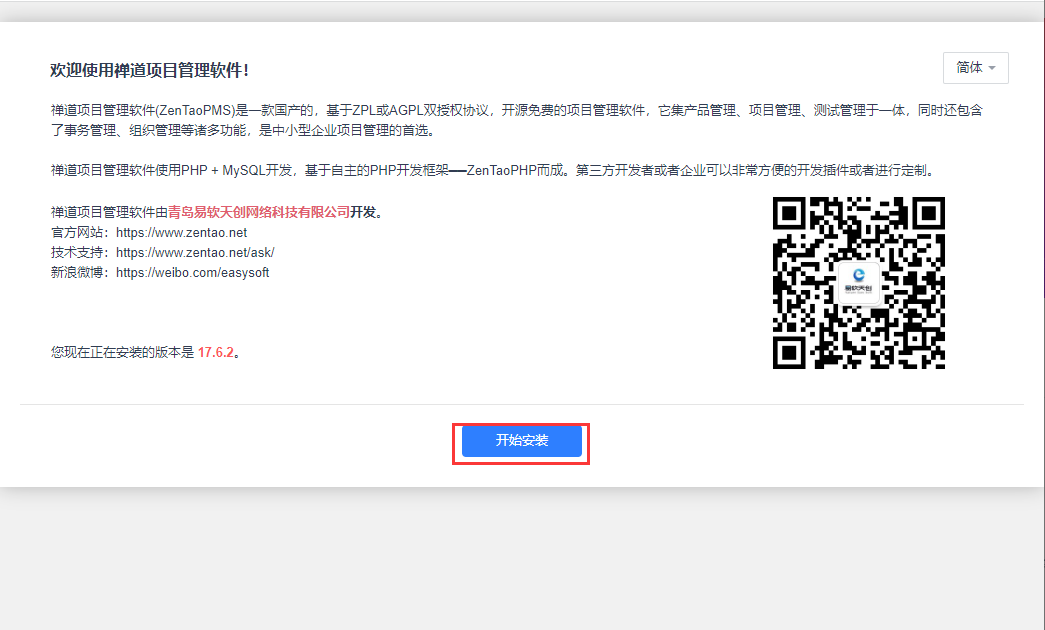 3. 接受License许可,安装进入环境检测页面,点击下一步
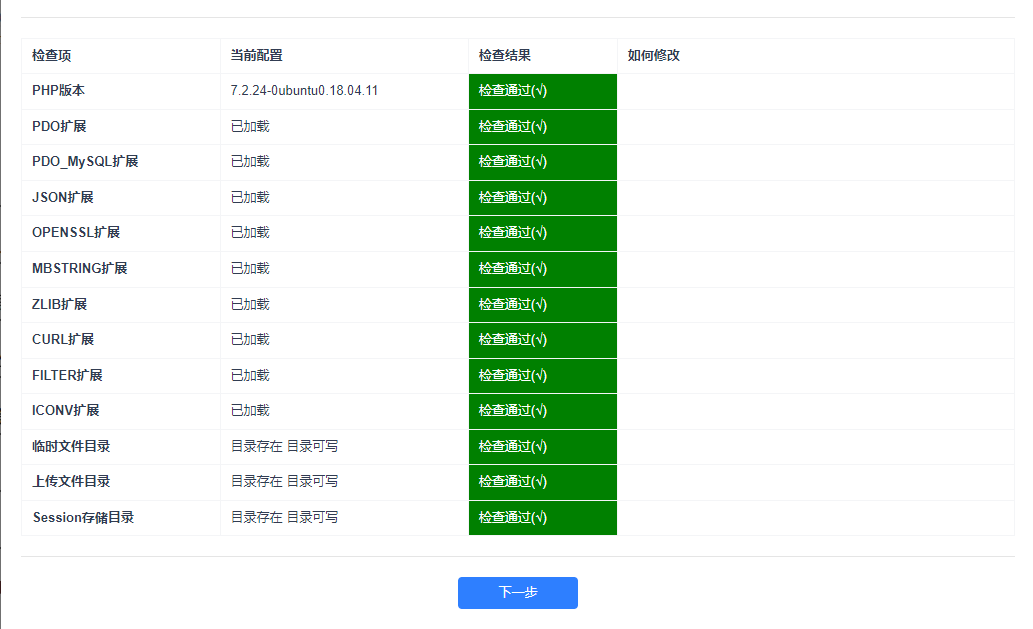 4. 系统初始化已经设置好数据库参数,点击下一步
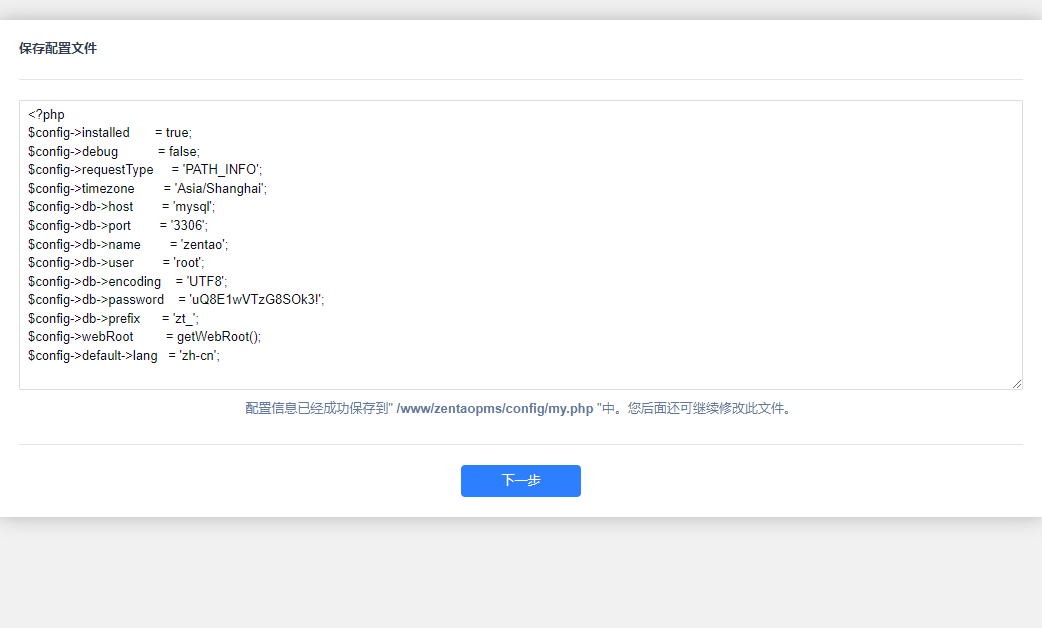
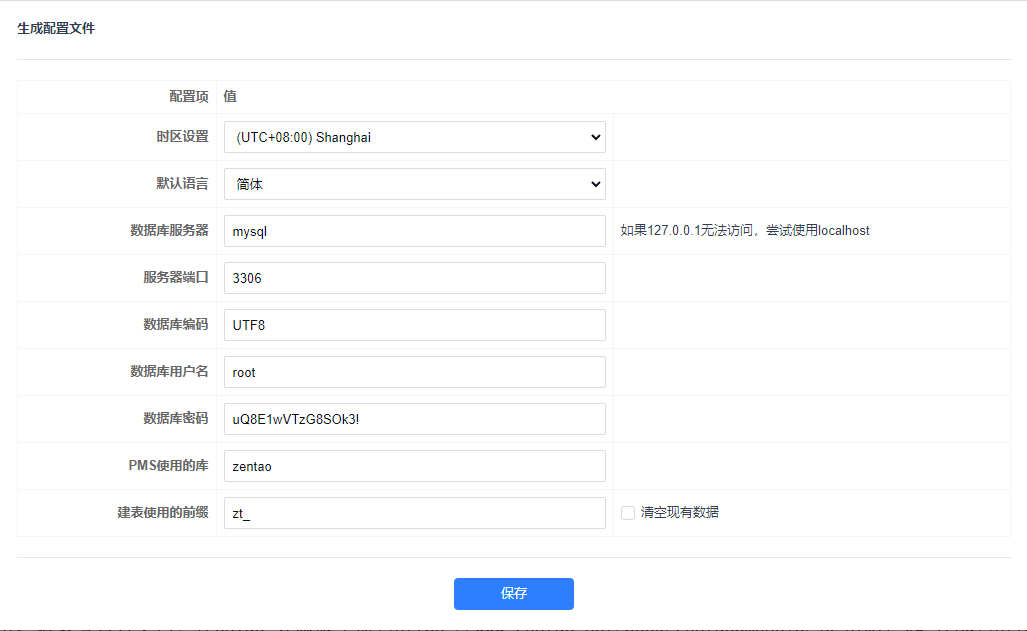 5. 保存配置文件
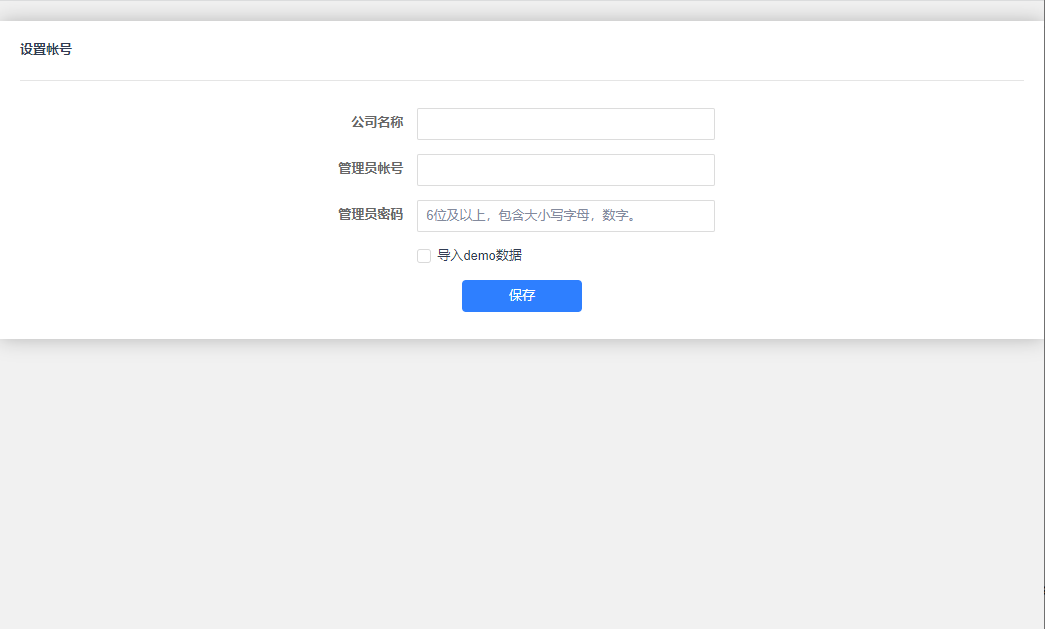
 6. 设置后台账号信息,请务必设置好并牢记之,然后“保存”(建议勾选导入 demo 数据,以便理解系统)
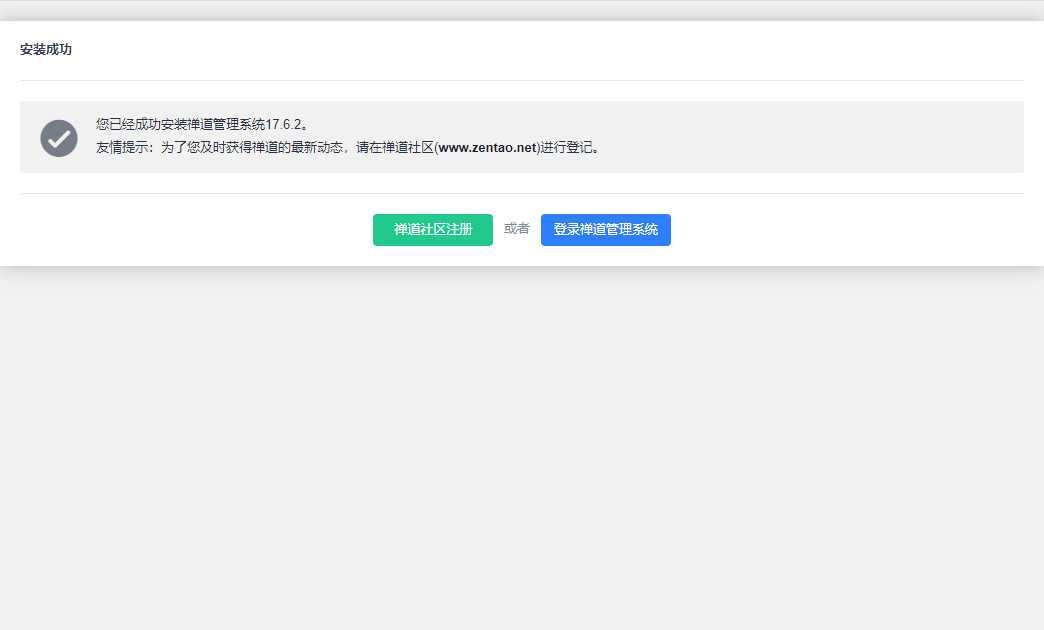
 7. 系统完成最后一步安装,提示安装成功
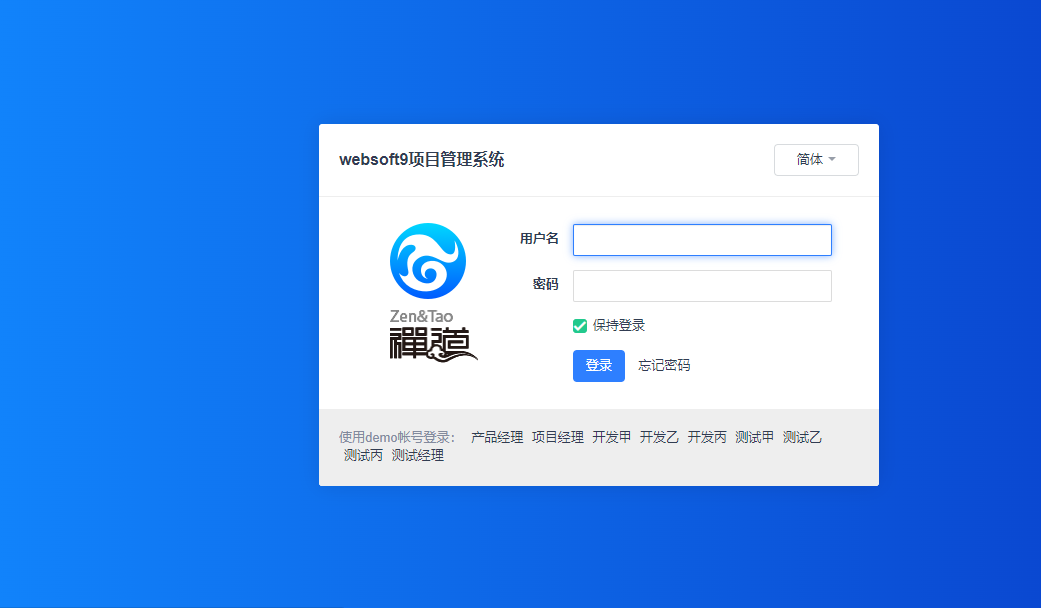
 8. 根据您设置的用户和密码登录后台
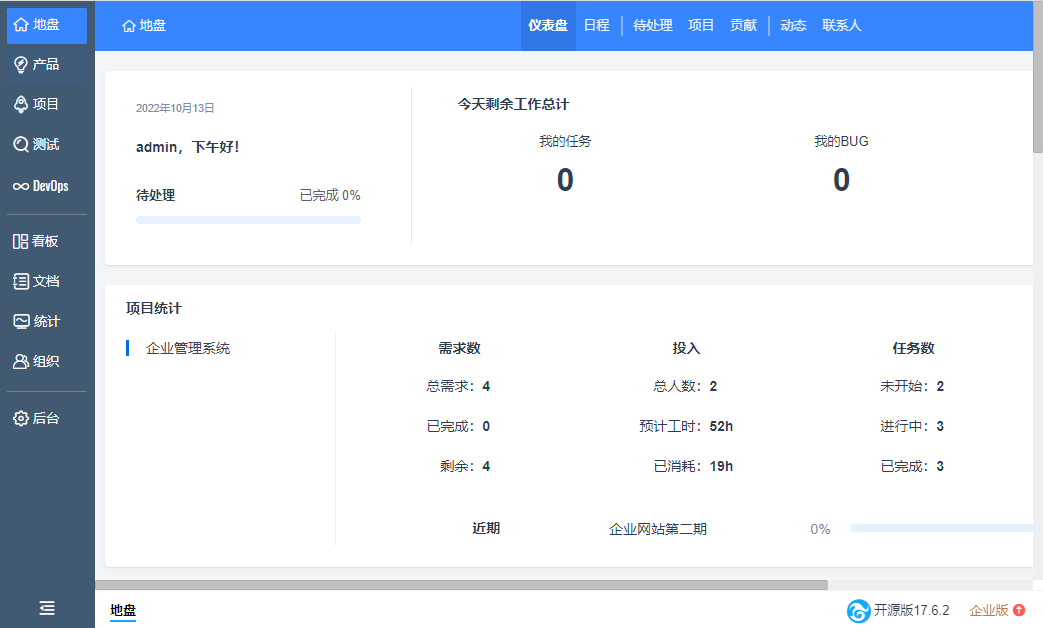
 9. 体验后台
 10. 注册 ZenTao 官网账号,便于后续在线安装插件
> 需要了解更多 ZenTao 的使用,请参考官方文档:ZenTao 开源版手册 和 FAQ
#### 出现问题?[](https://support.websoft9.com/docs/zentao#%E5%87%BA%E7%8E%B0%E9%97%AE%E9%A2%98)
若碰到问题,请第一时刻联系 **技术支持**。也可以先参考下面列出的问题定位或 **FAQ** 尝试快速解决问题。
### ZenTao 常用操作[](https://support.websoft9.com/docs/zentao#zentao-%E5%B8%B8%E7%94%A8%E6%93%8D%E4%BD%9C)
#### 配置 SMTP[](https://support.websoft9.com/docs/zentao#%E9%85%8D%E7%BD%AE-smtp)
ZenTao 配置 SMTP 发邮件的步骤:
1. 在邮箱管理控制台获取 SMTP 相关参数
2. 登录禅道,打开:【后台】>【通知】>【邮件】,选择 STMP 作为发信方式
3. 填写准确的 SMTP 设置项信息
* 发送模式选择“SMTP”,加密方式选择“SSL/TLS”;
* 输入发送方邮箱地址;
* 认证方式选择“登录”,并勾选“需要认证”选项;
* 输入 SMTP 服务器地址和 SMTP 服务器的端口号;
* 输入和发件人邮箱一致的邮箱地址;
* 输入该邮箱地址的 SMTP 服务的授权码或密码;
* 存储凭据;
10. 注册 ZenTao 官网账号,便于后续在线安装插件
> 需要了解更多 ZenTao 的使用,请参考官方文档:ZenTao 开源版手册 和 FAQ
#### 出现问题?[](https://support.websoft9.com/docs/zentao#%E5%87%BA%E7%8E%B0%E9%97%AE%E9%A2%98)
若碰到问题,请第一时刻联系 **技术支持**。也可以先参考下面列出的问题定位或 **FAQ** 尝试快速解决问题。
### ZenTao 常用操作[](https://support.websoft9.com/docs/zentao#zentao-%E5%B8%B8%E7%94%A8%E6%93%8D%E4%BD%9C)
#### 配置 SMTP[](https://support.websoft9.com/docs/zentao#%E9%85%8D%E7%BD%AE-smtp)
ZenTao 配置 SMTP 发邮件的步骤:
1. 在邮箱管理控制台获取 SMTP 相关参数
2. 登录禅道,打开:【后台】>【通知】>【邮件】,选择 STMP 作为发信方式
3. 填写准确的 SMTP 设置项信息
* 发送模式选择“SMTP”,加密方式选择“SSL/TLS”;
* 输入发送方邮箱地址;
* 认证方式选择“登录”,并勾选“需要认证”选项;
* 输入 SMTP 服务器地址和 SMTP 服务器的端口号;
* 输入和发件人邮箱一致的邮箱地址;
* 输入该邮箱地址的 SMTP 服务的授权码或密码;
* 存储凭据;
 4. 设置完成后,触发消息通知,检验 SMTP 是否正确
#### 配置多语言[](https://support.websoft9.com/docs/zentao#%E9%85%8D%E7%BD%AE%E5%A4%9A%E8%AF%AD%E8%A8%80)
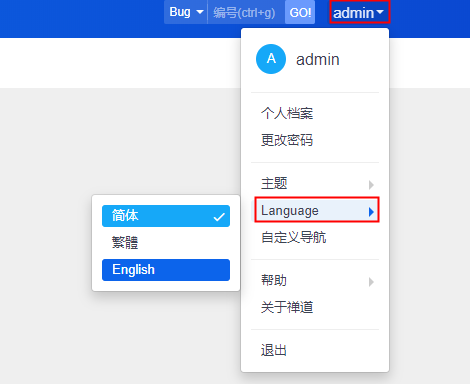
ZenTao 支持多语言,直接到后台切换即可。
#### 安装插件[](https://support.websoft9.com/docs/zentao#%E5%AE%89%E8%A3%85%E6%8F%92%E4%BB%B6)
ZenTao 提供了 插件市场 以方便用户扩展功能
1. 登录后台,打开**插件市场**,搜寻所需的扩展
4. 设置完成后,触发消息通知,检验 SMTP 是否正确
#### 配置多语言[](https://support.websoft9.com/docs/zentao#%E9%85%8D%E7%BD%AE%E5%A4%9A%E8%AF%AD%E8%A8%80)
ZenTao 支持多语言,直接到后台切换即可。

#### 安装插件[](https://support.websoft9.com/docs/zentao#%E5%AE%89%E8%A3%85%E6%8F%92%E4%BB%B6)
ZenTao 提供了 插件市场 以方便用户扩展功能
1. 登录后台,打开**插件市场**,搜寻所需的扩展
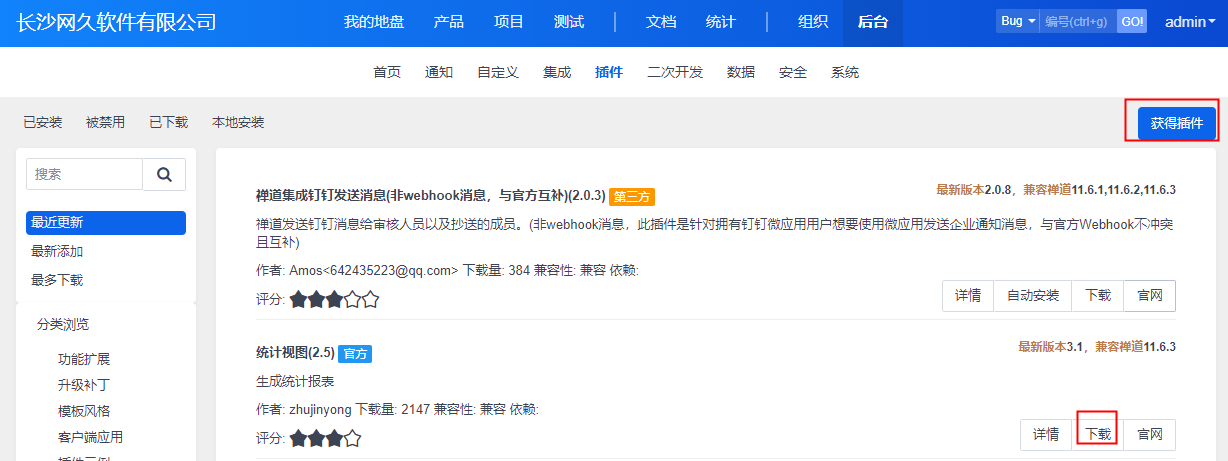 2. 点击【下载】,开始安装(安装过程中需要登录 ZenTao 官网)
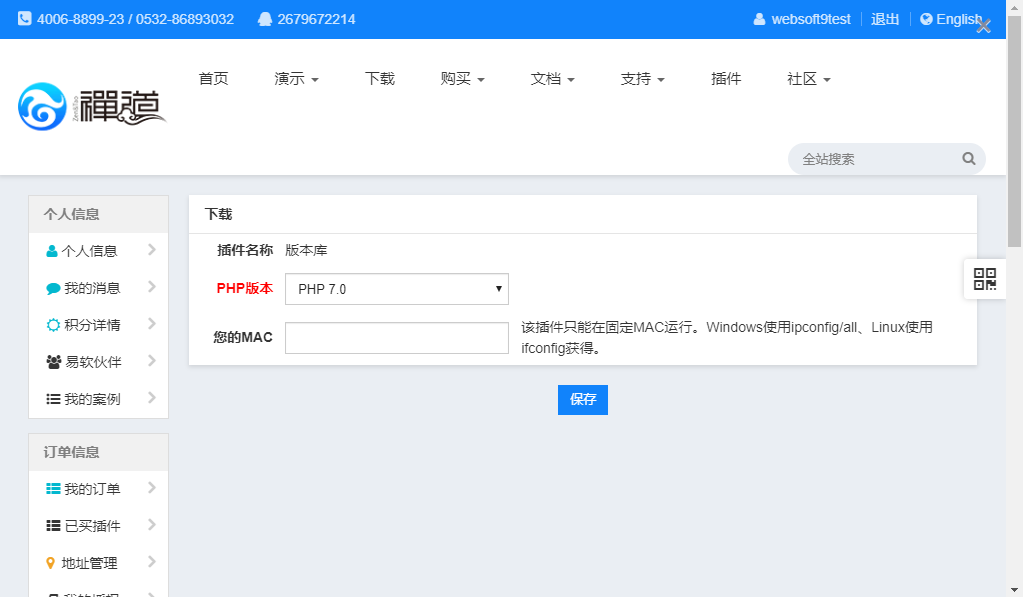 3. 如果是收费插件,需要输入本地电脑的 MAC 地址以验证版权
也可以通过手工安装插件:下载插件,并压缩,然后将目录拷贝到禅道对应的目录,比如 */zentao/module*
#### 重置管理员密码[](https://support.websoft9.com/docs/zentao#%E9%87%8D%E7%BD%AE%E7%AE%A1%E7%90%86%E5%91%98%E5%AF%86%E7%A0%81)
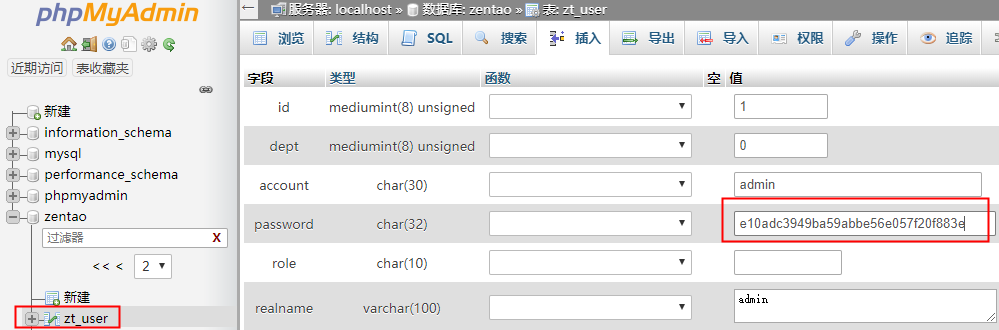
禅道管理员密码忘记了,怎么找回? 使用 phpMyAdmin 登录禅道数据库 **zt\_user** 表,找到用户的记录,把 password 的值改成 `e10adc3949ba59abbe56e057f20f883e` ,登录密码重置为:`123456`。
#### ZenTao 集成 Git[](https://support.websoft9.com/docs/zentao#zentao-%E9%9B%86%E6%88%90-git)
参考官方文档:集成禅道和 Git
### ZenTao 参数[](https://support.websoft9.com/docs/zentao#zentao-%E5%8F%82%E6%95%B0)
ZenTao 应用中包含 Docker, Portainer 等组件,可通过 **通用参数表** 查看路径、服务、端口等参数。
通过运行 `docker ps`,查看 ZenTao 运行时所有的服务组件:
```
CONTAINER ID IMAGE COMMAND CREATED STATUS PORTS NAMES
bbe3b0d3441d easysoft/zentao:latest "bash -c 'cat /my_cm…" 8 minutes ago Up 8 minutes 0.0.0.0:9003->80/tcp, :::9003->80/tcp zentao
0c04db7cc20a mysql:5.7 "docker-entrypoint.s…" 8 minutes ago Up 8 minutes 3306/tcp, 33060/tcp zentao-db
```
#### 路径[](https://support.websoft9.com/docs/zentao#path)
ZenTao 安装目录: */data/apps/zentao*\
ZenTao 源码路径: */data/apps/zentao/data/zentao*\
ZenTao 配置文件: */data/apps/zentao/data/zentao/config/config.php*
#### 端口[](https://support.websoft9.com/docs/zentao#port)
无特殊端口
#### 版本[](https://support.websoft9.com/docs/zentao#%E7%89%88%E6%9C%AC)
```
# ZenTao Version
cat /data/apps/zentao/data/zentao/VERSION
```
#### 服务[](https://support.websoft9.com/docs/zentao#%E6%9C%8D%E5%8A%A1)
```
sudo docker start | stop | restart | stats zentao
sudo docker start | stop | restart | stats zentao-db
```
#### 命令行[](https://support.websoft9.com/docs/zentao#%E5%91%BD%E4%BB%A4%E8%A1%8C)
ZenTao 提供了一套命令操作,详情参考官方文档:初始化管理脚本
#### API[](https://support.websoft9.com/docs/zentao#api)
[ZenTao API](https://www.zentao.net/book/api/setting-369.html) 所有请求结果都用 JSON 格式,根据返回结果 status 状态来判断是否请求成功。
---
# Agent Instructions: Querying This Documentation
If you need additional information that is not directly available in this page, you can query the documentation dynamically by asking a question.
Perform an HTTP GET request on the current page URL with the `ask` query parameter:
```
GET https://docs.imdcinsights.com/ying-yong-zhong-xin/xie-zuo-yu-sheng-chan-li/zentao-chan-dao-kuai-su-ru-men.md?ask=
```
The question should be specific, self-contained, and written in natural language.
The response will contain a direct answer to the question and relevant excerpts and sources from the documentation.
Use this mechanism when the answer is not explicitly present in the current page, you need clarification or additional context, or you want to retrieve related documentation sections.
3. 如果是收费插件,需要输入本地电脑的 MAC 地址以验证版权
也可以通过手工安装插件:下载插件,并压缩,然后将目录拷贝到禅道对应的目录,比如 */zentao/module*
#### 重置管理员密码[](https://support.websoft9.com/docs/zentao#%E9%87%8D%E7%BD%AE%E7%AE%A1%E7%90%86%E5%91%98%E5%AF%86%E7%A0%81)
禅道管理员密码忘记了,怎么找回? 使用 phpMyAdmin 登录禅道数据库 **zt\_user** 表,找到用户的记录,把 password 的值改成 `e10adc3949ba59abbe56e057f20f883e` ,登录密码重置为:`123456`。

#### ZenTao 集成 Git[](https://support.websoft9.com/docs/zentao#zentao-%E9%9B%86%E6%88%90-git)
参考官方文档:集成禅道和 Git
### ZenTao 参数[](https://support.websoft9.com/docs/zentao#zentao-%E5%8F%82%E6%95%B0)
ZenTao 应用中包含 Docker, Portainer 等组件,可通过 **通用参数表** 查看路径、服务、端口等参数。
通过运行 `docker ps`,查看 ZenTao 运行时所有的服务组件:
```
CONTAINER ID IMAGE COMMAND CREATED STATUS PORTS NAMES
bbe3b0d3441d easysoft/zentao:latest "bash -c 'cat /my_cm…" 8 minutes ago Up 8 minutes 0.0.0.0:9003->80/tcp, :::9003->80/tcp zentao
0c04db7cc20a mysql:5.7 "docker-entrypoint.s…" 8 minutes ago Up 8 minutes 3306/tcp, 33060/tcp zentao-db
```
#### 路径[](https://support.websoft9.com/docs/zentao#path)
ZenTao 安装目录: */data/apps/zentao*\
ZenTao 源码路径: */data/apps/zentao/data/zentao*\
ZenTao 配置文件: */data/apps/zentao/data/zentao/config/config.php*
#### 端口[](https://support.websoft9.com/docs/zentao#port)
无特殊端口
#### 版本[](https://support.websoft9.com/docs/zentao#%E7%89%88%E6%9C%AC)
```
# ZenTao Version
cat /data/apps/zentao/data/zentao/VERSION
```
#### 服务[](https://support.websoft9.com/docs/zentao#%E6%9C%8D%E5%8A%A1)
```
sudo docker start | stop | restart | stats zentao
sudo docker start | stop | restart | stats zentao-db
```
#### 命令行[](https://support.websoft9.com/docs/zentao#%E5%91%BD%E4%BB%A4%E8%A1%8C)
ZenTao 提供了一套命令操作,详情参考官方文档:初始化管理脚本
#### API[](https://support.websoft9.com/docs/zentao#api)
[ZenTao API](https://www.zentao.net/book/api/setting-369.html) 所有请求结果都用 JSON 格式,根据返回结果 status 状态来判断是否请求成功。
---
# Agent Instructions: Querying This Documentation
If you need additional information that is not directly available in this page, you can query the documentation dynamically by asking a question.
Perform an HTTP GET request on the current page URL with the `ask` query parameter:
```
GET https://docs.imdcinsights.com/ying-yong-zhong-xin/xie-zuo-yu-sheng-chan-li/zentao-chan-dao-kuai-su-ru-men.md?ask=
```
The question should be specific, self-contained, and written in natural language.
The response will contain a direct answer to the question and relevant excerpts and sources from the documentation.
Use this mechanism when the answer is not explicitly present in the current page, you need clarification or additional context, or you want to retrieve related documentation sections.