# Portainer快速入门
 部署 创达睿通 提供的 Portainer 之后,请参考下面的步骤快速入门。
### 准备[](https://support.websoft9.com/docs/portainer#%E5%87%86%E5%A4%87)
1. 在云控制台获取您的 **服务器公网IP地址**
2. 在云控制台安全组中,确保 **Inbound(入)规则** 下的 **TCP:80** 端口已经开启
3. 若想用域名访问 Portainer,务必先完成 **域名五步设置** 过程
### Portainer 初始化向导[](https://support.websoft9.com/docs/portainer#portainer-%E5%88%9D%E5%A7%8B%E5%8C%96%E5%90%91%E5%AF%BC)
#### 详细步骤[](https://support.websoft9.com/docs/portainer#%E8%AF%A6%E7%BB%86%E6%AD%A5%E9%AA%A4)
1. 使用 SSH 连接服务器,运行下面的命令,查看 Docker 的安装信息和运行状态
```
sudo docker info
sudo systemctl status docker
```
运行服务状态查询命令,Docker 正常运行会得到 " Active: active (running)... " 的反馈
2. 通过本地浏览器访问:*``* 直接进入 Portainer 界面
部署 创达睿通 提供的 Portainer 之后,请参考下面的步骤快速入门。
### 准备[](https://support.websoft9.com/docs/portainer#%E5%87%86%E5%A4%87)
1. 在云控制台获取您的 **服务器公网IP地址**
2. 在云控制台安全组中,确保 **Inbound(入)规则** 下的 **TCP:80** 端口已经开启
3. 若想用域名访问 Portainer,务必先完成 **域名五步设置** 过程
### Portainer 初始化向导[](https://support.websoft9.com/docs/portainer#portainer-%E5%88%9D%E5%A7%8B%E5%8C%96%E5%90%91%E5%AF%BC)
#### 详细步骤[](https://support.websoft9.com/docs/portainer#%E8%AF%A6%E7%BB%86%E6%AD%A5%E9%AA%A4)
1. 使用 SSH 连接服务器,运行下面的命令,查看 Docker 的安装信息和运行状态
```
sudo docker info
sudo systemctl status docker
```
运行服务状态查询命令,Docker 正常运行会得到 " Active: active (running)... " 的反馈
2. 通过本地浏览器访问:*``* 直接进入 Portainer 界面
 > Portainer官方容器启动后,如果不设置初始密码,超过5分钟会提示超时,需要执行`sudo docker restart portainer`
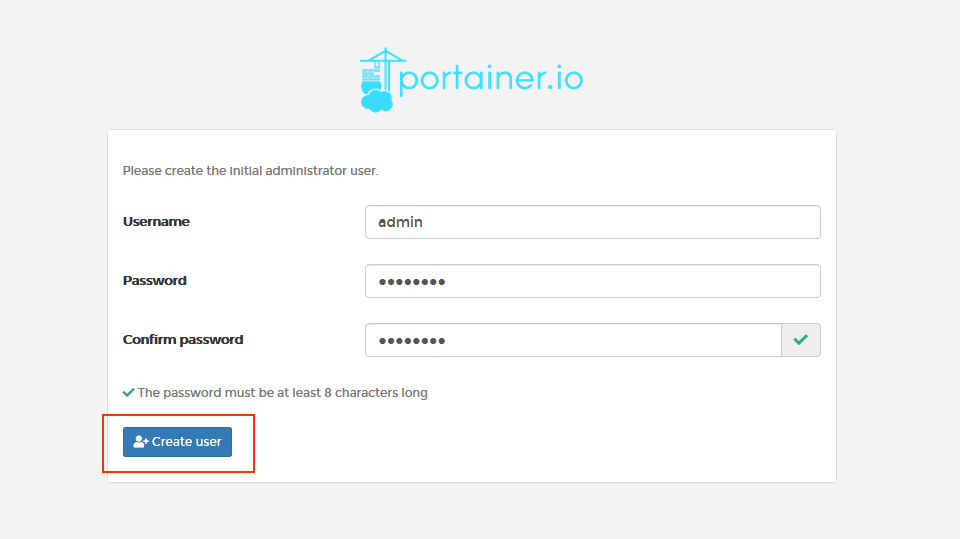
3. 自行设置管理员账号密码,点击【Create user】
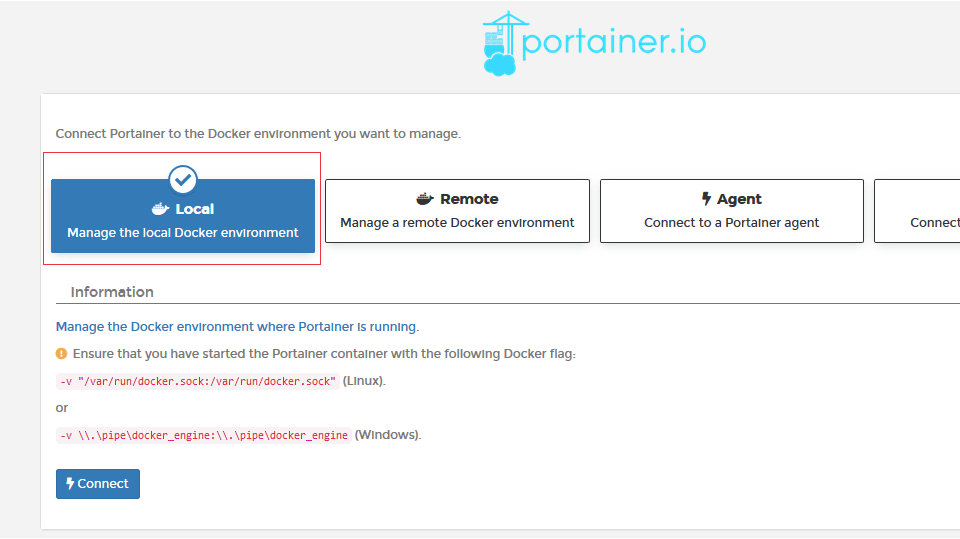
4. 选择【Local】作为镜像连接选项,然后点击【Connect】
> Portainer官方容器启动后,如果不设置初始密码,超过5分钟会提示超时,需要执行`sudo docker restart portainer`
3. 自行设置管理员账号密码,点击【Create user】
4. 选择【Local】作为镜像连接选项,然后点击【Connect】
 5. 进入Portainer后台管理界面,点击Local项目就可以开始使用Portainer
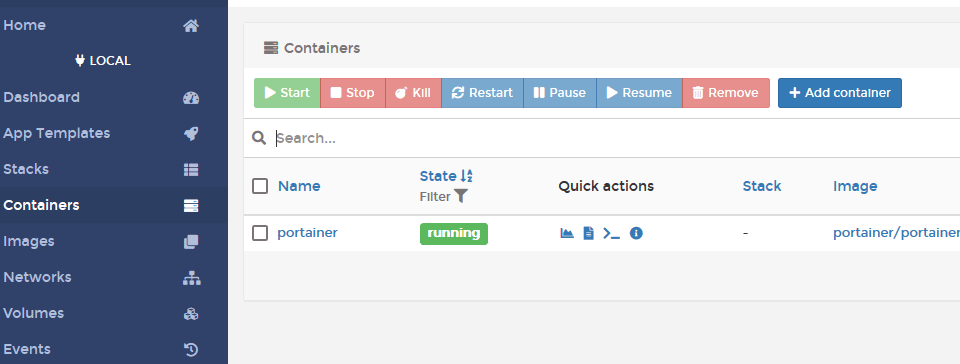
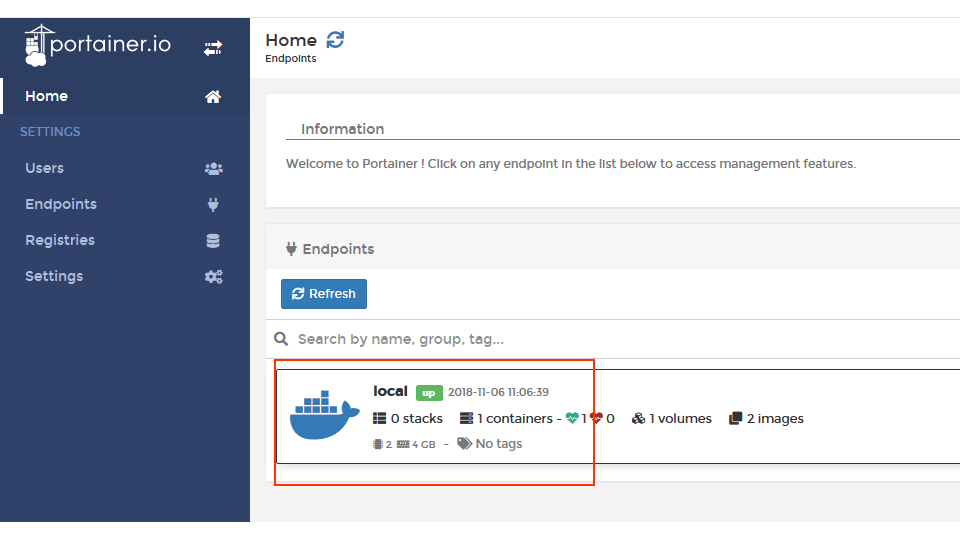 6. 通过 Portainer 查看运行容器,你会发现 Portainer 本身也是运行在容器中的
 > 需要了解更多 Docker 的使用,请参考官方文档:[Docker Documentation](https://docs.docker.com/)
#### 出现问题?[](https://support.websoft9.com/docs/portainer#%E5%87%BA%E7%8E%B0%E9%97%AE%E9%A2%98)
若碰到问题,请第一时刻联系 **技术支持**。也可以先参考下面列出的问题定位或 **FAQ** 尝试快速解决问题:
### Portainer 使用入门[](https://support.websoft9.com/docs/portainer#portainer-%E4%BD%BF%E7%94%A8%E5%85%A5%E9%97%A8)
下面以部署一个 WordPress 网站为场景,描述 Portainer 的使用:
#### 部署 MySQL 容器[](https://support.websoft9.com/docs/portainer#%E9%83%A8%E7%BD%B2-mysql-%E5%AE%B9%E5%99%A8)
下面详细介绍通过 Portainer 部署MySQL:
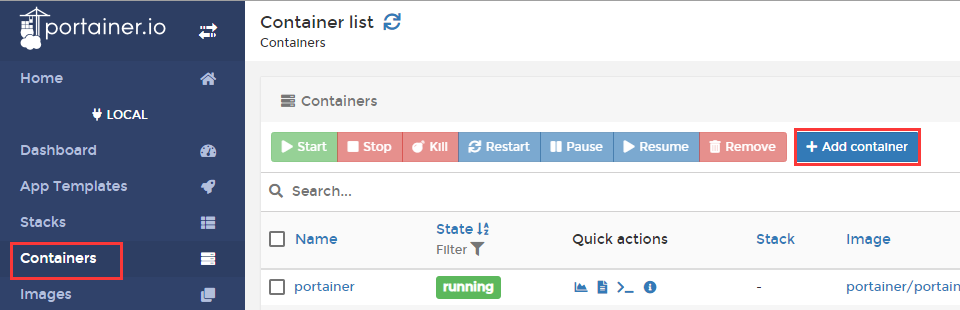
1. 登录 Portainer ,打开【Containers】>【Add container】
> 需要了解更多 Docker 的使用,请参考官方文档:[Docker Documentation](https://docs.docker.com/)
#### 出现问题?[](https://support.websoft9.com/docs/portainer#%E5%87%BA%E7%8E%B0%E9%97%AE%E9%A2%98)
若碰到问题,请第一时刻联系 **技术支持**。也可以先参考下面列出的问题定位或 **FAQ** 尝试快速解决问题:
### Portainer 使用入门[](https://support.websoft9.com/docs/portainer#portainer-%E4%BD%BF%E7%94%A8%E5%85%A5%E9%97%A8)
下面以部署一个 WordPress 网站为场景,描述 Portainer 的使用:
#### 部署 MySQL 容器[](https://support.websoft9.com/docs/portainer#%E9%83%A8%E7%BD%B2-mysql-%E5%AE%B9%E5%99%A8)
下面详细介绍通过 Portainer 部署MySQL:
1. 登录 Portainer ,打开【Containers】>【Add container】
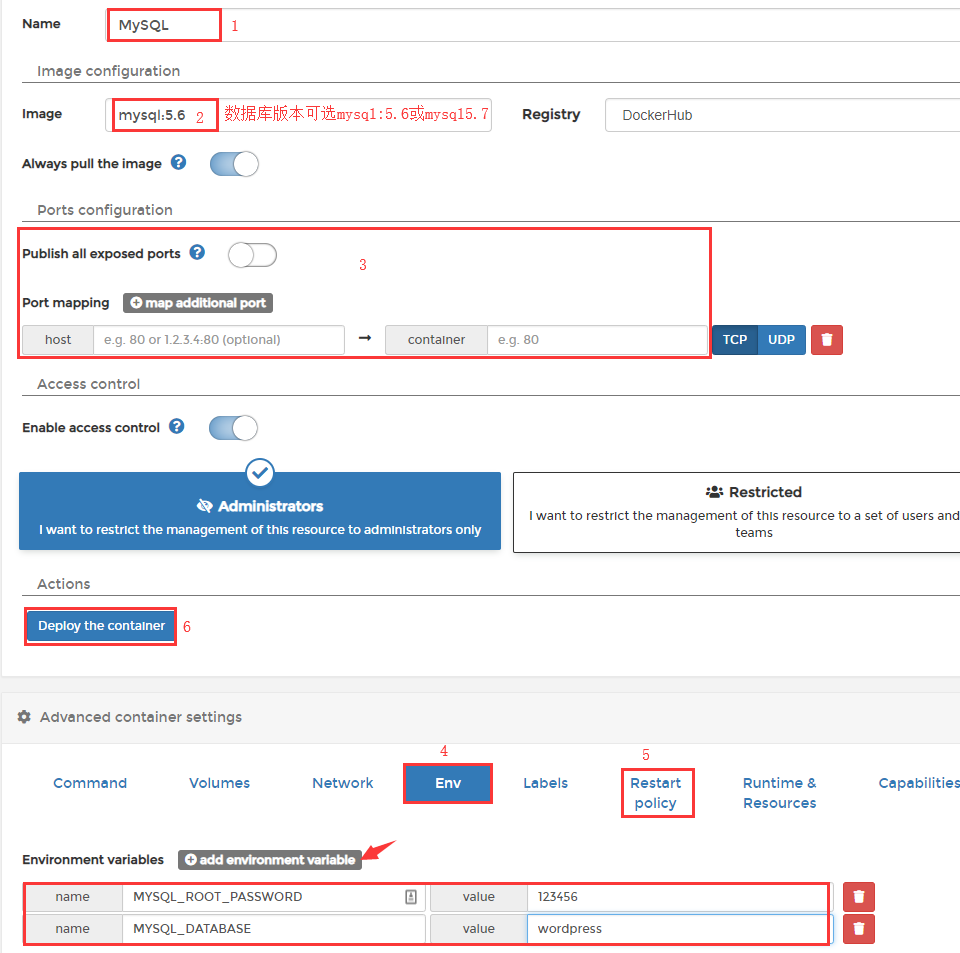
 2. 设置容器运行所需的参数(下面示图并描述重点设置部分)
* Name 为自定义的容器名称
* Image 为容器镜像名称,例如"mysql:5.6" 系统会自动到[DockerHub](https://hub.docker.com/)中拉取MySQL5.6
* Network ports configuration:建议开启【Publish all exposed network ports...】 以保证容器中的服务可以通过服务器端口被外界访问。如果不开启,需手工建立准确的映射关系(**难度系数有点高**)。
* Env 环境变量设置:添加如所示的容器环境变量,对于MySQL镜像来说,数据库 root 密码**MySQL\_ROOT\_PASSWORD** 为必填变量,其他更多可选变量查看 [MySQL镜像说明](https://hub.docker.com/_/mysql)
* Restart policy:建议选择【Always】,使得容器无论在什么情况下停止总会自动重新启动;
2. 设置容器运行所需的参数(下面示图并描述重点设置部分)
* Name 为自定义的容器名称
* Image 为容器镜像名称,例如"mysql:5.6" 系统会自动到[DockerHub](https://hub.docker.com/)中拉取MySQL5.6
* Network ports configuration:建议开启【Publish all exposed network ports...】 以保证容器中的服务可以通过服务器端口被外界访问。如果不开启,需手工建立准确的映射关系(**难度系数有点高**)。
* Env 环境变量设置:添加如所示的容器环境变量,对于MySQL镜像来说,数据库 root 密码**MySQL\_ROOT\_PASSWORD** 为必填变量,其他更多可选变量查看 [MySQL镜像说明](https://hub.docker.com/_/mysql)
* Restart policy:建议选择【Always】,使得容器无论在什么情况下停止总会自动重新启动;
 3. 点击 Deploy the container 创建容器;
4. 如果服务器安全组的 3306 端口已经开放,现在就可以在本地通过远程连接 MySQL 数据库
#### 部署 WordPress 容器[](https://support.websoft9.com/docs/portainer#%E9%83%A8%E7%BD%B2-wordpress-%E5%AE%B9%E5%99%A8)
下面详细介绍通过 Portainer 部署 WordPress 以及使用上一步的 MySQL 作为数据存储:
1. 登录 Portainer ,打开【Containers】>【Add container】
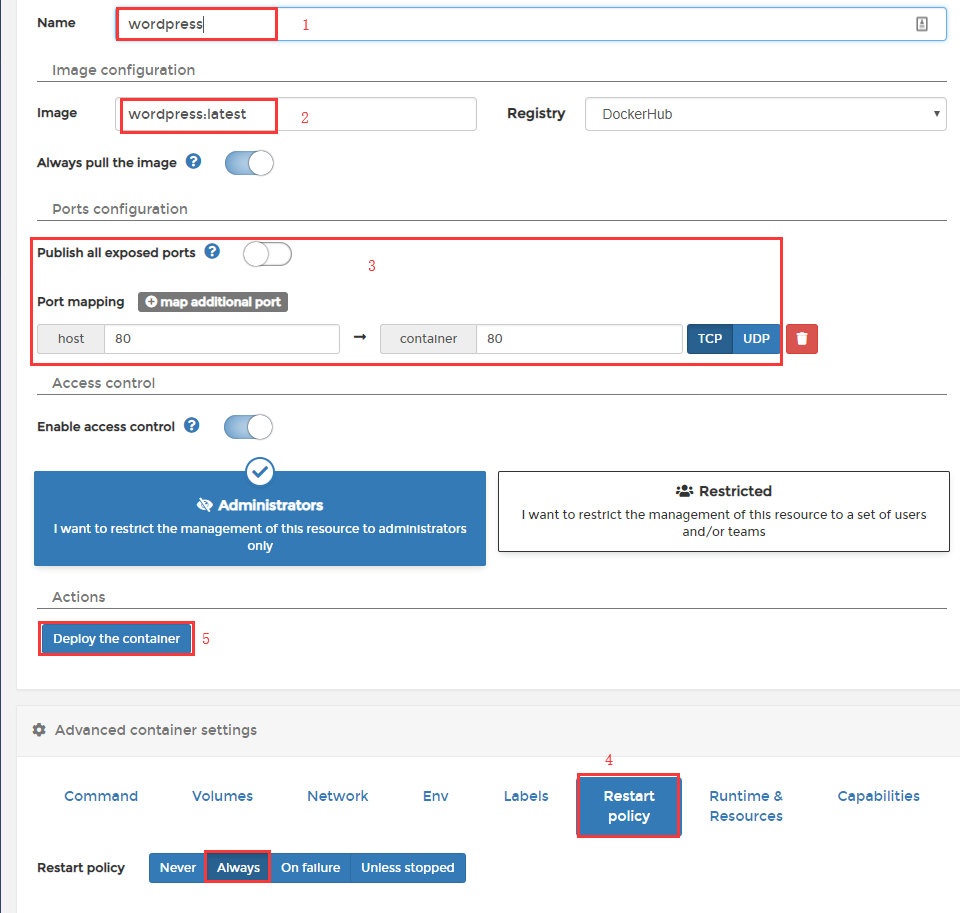
2. 设置容器运行所需的参数(下面示图并描述重点设置部分)
* Name 为自定义的容器名称
* Image 为容器镜像名称,例如"wordpress" 系统会自动到DockerHub中拉取WordPress
* Network ports configuration:建议开启【Publish all exposed network ports...】 以保证容器中的服务可以自动匹配服务器端口被外界访问。如果不开启,需手工建立准确的映射关系(**难度系数有点高**)。
* Restart policy:建议选择【Always】,使得容器无论在什么情况下停止总会自动重新启动;
3. 点击 Deploy the container 创建容器;
4. 如果服务器安全组的 3306 端口已经开放,现在就可以在本地通过远程连接 MySQL 数据库
#### 部署 WordPress 容器[](https://support.websoft9.com/docs/portainer#%E9%83%A8%E7%BD%B2-wordpress-%E5%AE%B9%E5%99%A8)
下面详细介绍通过 Portainer 部署 WordPress 以及使用上一步的 MySQL 作为数据存储:
1. 登录 Portainer ,打开【Containers】>【Add container】
2. 设置容器运行所需的参数(下面示图并描述重点设置部分)
* Name 为自定义的容器名称
* Image 为容器镜像名称,例如"wordpress" 系统会自动到DockerHub中拉取WordPress
* Network ports configuration:建议开启【Publish all exposed network ports...】 以保证容器中的服务可以自动匹配服务器端口被外界访问。如果不开启,需手工建立准确的映射关系(**难度系数有点高**)。
* Restart policy:建议选择【Always】,使得容器无论在什么情况下停止总会自动重新启动;
 3. 点击 Deploy the container 创建容器,创建成功后查看映射的服务器端口号;
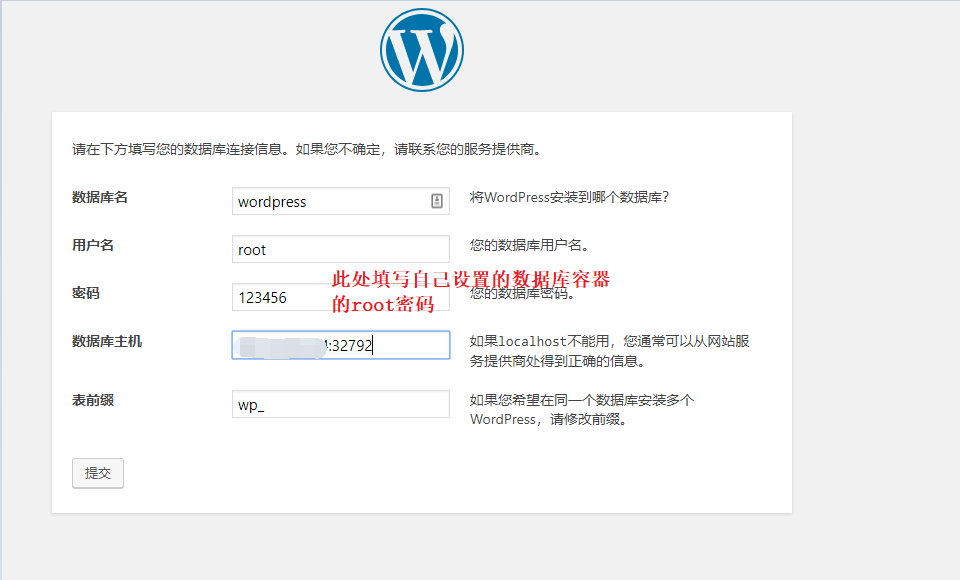
4. 本地浏览器访问:*`http://服务器公网IP:端口`* 即可访问 WordPress 的初始化安装界面
3. 点击 Deploy the container 创建容器,创建成功后查看映射的服务器端口号;
4. 本地浏览器访问:*`http://服务器公网IP:端口`* 即可访问 WordPress 的初始化安装界面
 5. 此处如果你打算使用MySQL容器,数据库主机地址填写的是 **服务器公网IP:端口**
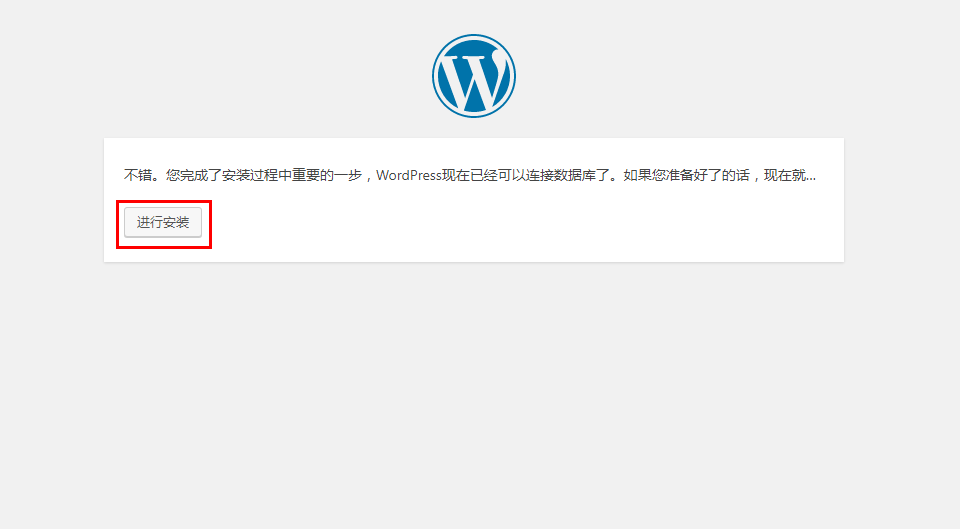
 6. 数据库验证通过后,系统提示正式“进行安装”
 #### Nginx 容器绑定域名[](https://support.websoft9.com/docs/portainer#nginx-%E5%AE%B9%E5%99%A8%E7%BB%91%E5%AE%9A%E5%9F%9F%E5%90%8D)
以上一章节中的 Wordpress 网站作为示例,在 WordPress 部署完成后,需要在浏览器内输入 *``* 的形式访问网站,但我们不加端口就能访问域名,所以这时就要用到 Nginx 的端口转发功能。
我们使用使用一款可视化的 Nginx 管理器:[Nginx Proxy Manager](https://hub.docker.com/r/jc21/nginx-proxy-manager)
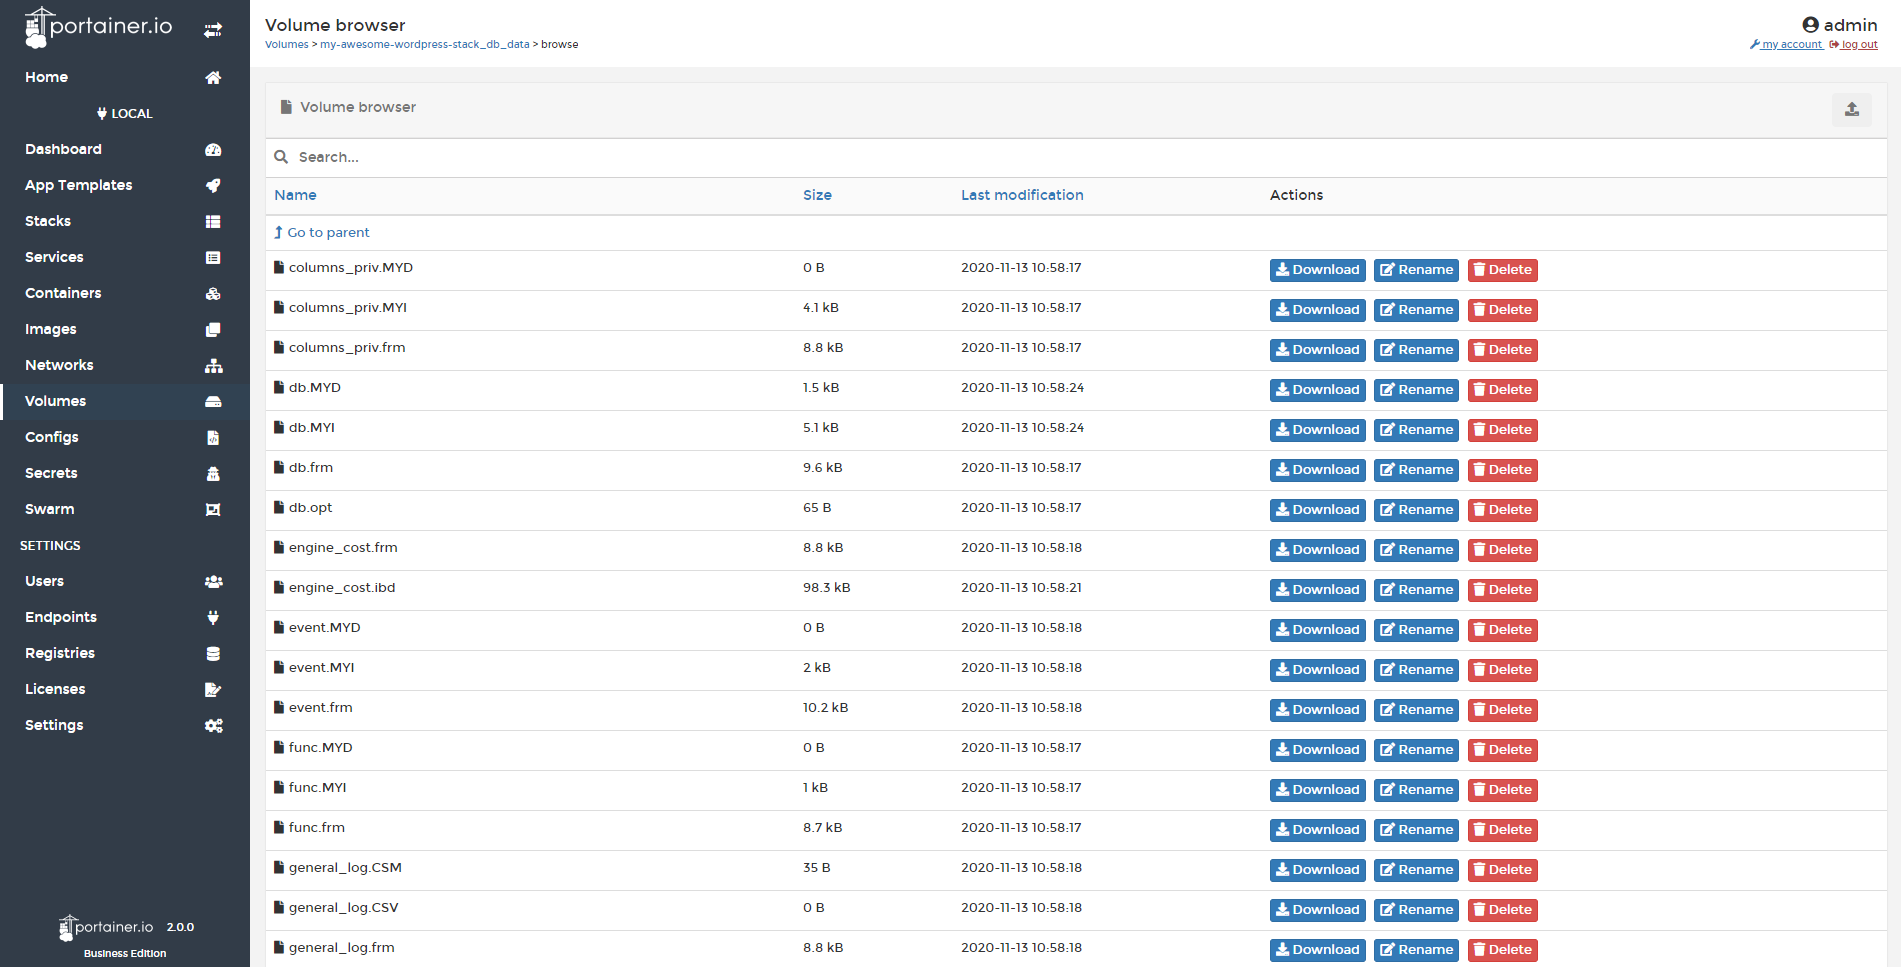
#### FileBrowser 容器管理文件[](https://support.websoft9.com/docs/portainer#filebrowser-%E5%AE%B9%E5%99%A8%E7%AE%A1%E7%90%86%E6%96%87%E4%BB%B6)
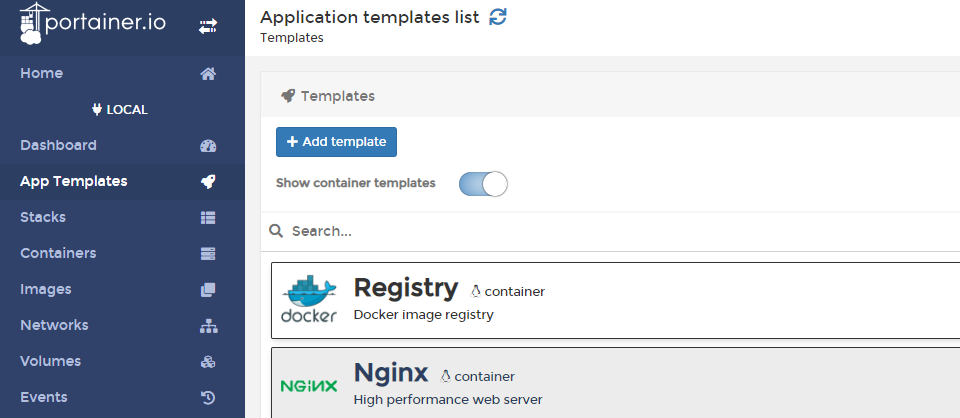
1. 进入到 Portainer 页面,选择左边的 **App Templates** 选项,往下找到 **File browser** 容器模板,单击选择;
#### Nginx 容器绑定域名[](https://support.websoft9.com/docs/portainer#nginx-%E5%AE%B9%E5%99%A8%E7%BB%91%E5%AE%9A%E5%9F%9F%E5%90%8D)
以上一章节中的 Wordpress 网站作为示例,在 WordPress 部署完成后,需要在浏览器内输入 *``* 的形式访问网站,但我们不加端口就能访问域名,所以这时就要用到 Nginx 的端口转发功能。
我们使用使用一款可视化的 Nginx 管理器:[Nginx Proxy Manager](https://hub.docker.com/r/jc21/nginx-proxy-manager)
#### FileBrowser 容器管理文件[](https://support.websoft9.com/docs/portainer#filebrowser-%E5%AE%B9%E5%99%A8%E7%AE%A1%E7%90%86%E6%96%87%E4%BB%B6)
1. 进入到 Portainer 页面,选择左边的 **App Templates** 选项,往下找到 **File browser** 容器模板,单击选择;
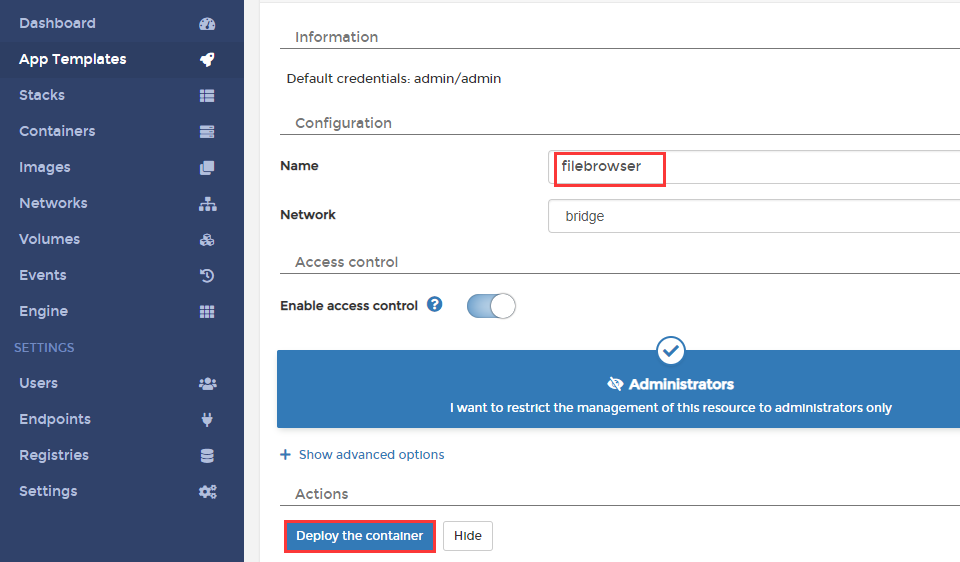
 2. 按照下图创建 File browser 容器;
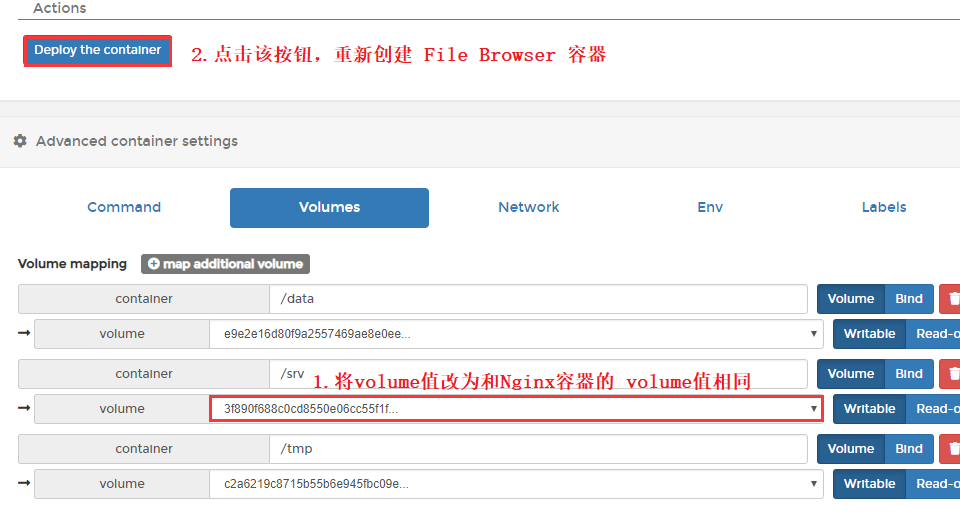
 3. 进入到容器列表,单击刚刚创建的 File browser 容器,点击 **Duplicate/Edit** 按钮,进入到修改容器信息页面;
 4. 按照下图,将 File browser 的 volume 值修改为 和 Nginx 的 volume 值相同;
 ### Portainer 常用操作[](https://support.websoft9.com/docs/portainer#portainer-%E5%B8%B8%E7%94%A8%E6%93%8D%E4%BD%9C)
**运行容器命令**[****](https://support.websoft9.com/docs/portainer#%E8%BF%90%E8%A1%8C%E5%AE%B9%E5%99%A8%E5%91%BD%E4%BB%A4)
在此以连接到 MySQL 容器为例进行说明:
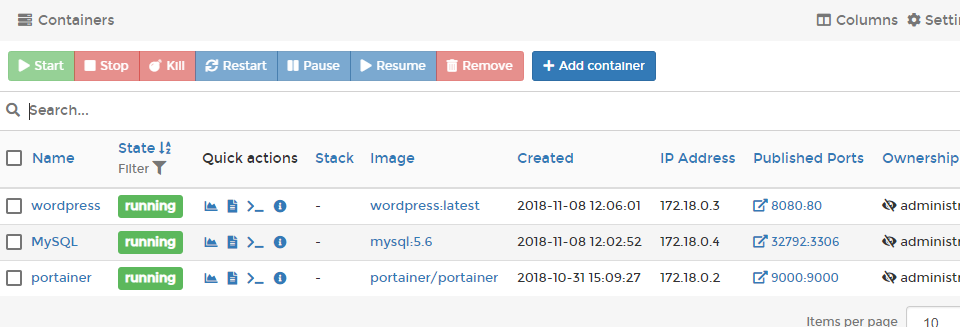
1. 返回到容器列表,点击下图中 MySQL 的 **Quick actions** 一栏下的 **>\_** 图标;
### Portainer 常用操作[](https://support.websoft9.com/docs/portainer#portainer-%E5%B8%B8%E7%94%A8%E6%93%8D%E4%BD%9C)
**运行容器命令**[****](https://support.websoft9.com/docs/portainer#%E8%BF%90%E8%A1%8C%E5%AE%B9%E5%99%A8%E5%91%BD%E4%BB%A4)
在此以连接到 MySQL 容器为例进行说明:
1. 返回到容器列表,点击下图中 MySQL 的 **Quick actions** 一栏下的 **>\_** 图标;
 2. 在新打开的页面,点击 **Connetc** 按钮,连接到容器;
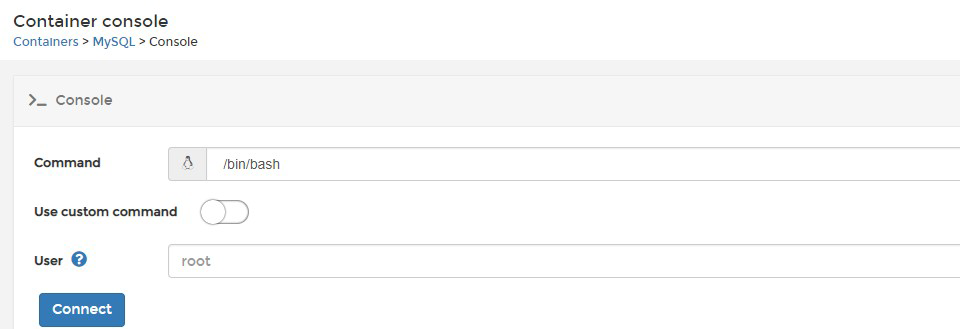 3. 接下来就可以在命令窗口中输入`mysql -uroot -ppassword;"`,其中 “password” 为您在自己设置的数据库密码,这样就可以开始使用数据库命令对 MySQL 进行管理了;
### 参数[](https://support.websoft9.com/docs/portainer#%E5%8F%82%E6%95%B0)
Portainer 应用中包含 Docker, Portainer 等组件,可通过 **通用参数表** 查看路径、服务、端口等参数。
通过运行 `docker ps`,查看 Portainer 运行时所有的服务组件:
```
CONTAINER ID IMAGE COMMAND CREATED STATUS PORTS NAMES
c47fe38db3bf portainer/portainer-ce:latest "/portainer" 2 months ago Up 13 days 8000/tcp, 9443/tcp, 0.0.0.0:9091->9000/tcp, :::9091->9000/tcp portainer
```
#### 路径[](https://support.websoft9.com/docs/portainer#path)
Portainer 数据目录:*/data/apps/portainer/data/portainer*
#### 端口[](https://support.websoft9.com/docs/portainer#%E7%AB%AF%E5%8F%A3)
除 80, 443 等常见端口需开启之外,以下端口可能会用到:
| 端口号 | 用途 | 必要性 |
| ---- | -------------------- | --- |
| 9091 | 通过 HTTP 访问 Portainer | 可选 |
#### 版本[](https://support.websoft9.com/docs/portainer#%E7%89%88%E6%9C%AC)
```
curl https://github.com/portainer/portainer/releases |grep Release |grep tag |head -1 |cut -d/ -f6 |cut -c 1-6
```
#### 服务[](https://support.websoft9.com/docs/portainer#%E6%9C%8D%E5%8A%A1)
```
sudo docker start | restart | stop | stats portainer
```
#### 命令行[](https://support.websoft9.com/docs/portainer#%E5%91%BD%E4%BB%A4%E8%A1%8C)
[Portainer CLI](https://docs.portainer.io/v/ce-2.9/advanced/cli)
#### API[](https://support.websoft9.com/docs/portainer#api)
[Portainer API](https://docs.portainer.io/v/ce-2.9/api/docs)
---
# Agent Instructions: Querying This Documentation
If you need additional information that is not directly available in this page, you can query the documentation dynamically by asking a question.
Perform an HTTP GET request on the current page URL with the `ask` query parameter:
```
GET https://docs.imdcinsights.com/ying-yong-zhong-xin/kai-fa-yun-wei/portainer-kuai-su-ru-men.md?ask=
```
The question should be specific, self-contained, and written in natural language.
The response will contain a direct answer to the question and relevant excerpts and sources from the documentation.
Use this mechanism when the answer is not explicitly present in the current page, you need clarification or additional context, or you want to retrieve related documentation sections.
3. 接下来就可以在命令窗口中输入`mysql -uroot -ppassword;"`,其中 “password” 为您在自己设置的数据库密码,这样就可以开始使用数据库命令对 MySQL 进行管理了;
### 参数[](https://support.websoft9.com/docs/portainer#%E5%8F%82%E6%95%B0)
Portainer 应用中包含 Docker, Portainer 等组件,可通过 **通用参数表** 查看路径、服务、端口等参数。
通过运行 `docker ps`,查看 Portainer 运行时所有的服务组件:
```
CONTAINER ID IMAGE COMMAND CREATED STATUS PORTS NAMES
c47fe38db3bf portainer/portainer-ce:latest "/portainer" 2 months ago Up 13 days 8000/tcp, 9443/tcp, 0.0.0.0:9091->9000/tcp, :::9091->9000/tcp portainer
```
#### 路径[](https://support.websoft9.com/docs/portainer#path)
Portainer 数据目录:*/data/apps/portainer/data/portainer*
#### 端口[](https://support.websoft9.com/docs/portainer#%E7%AB%AF%E5%8F%A3)
除 80, 443 等常见端口需开启之外,以下端口可能会用到:
| 端口号 | 用途 | 必要性 |
| ---- | -------------------- | --- |
| 9091 | 通过 HTTP 访问 Portainer | 可选 |
#### 版本[](https://support.websoft9.com/docs/portainer#%E7%89%88%E6%9C%AC)
```
curl https://github.com/portainer/portainer/releases |grep Release |grep tag |head -1 |cut -d/ -f6 |cut -c 1-6
```
#### 服务[](https://support.websoft9.com/docs/portainer#%E6%9C%8D%E5%8A%A1)
```
sudo docker start | restart | stop | stats portainer
```
#### 命令行[](https://support.websoft9.com/docs/portainer#%E5%91%BD%E4%BB%A4%E8%A1%8C)
[Portainer CLI](https://docs.portainer.io/v/ce-2.9/advanced/cli)
#### API[](https://support.websoft9.com/docs/portainer#api)
[Portainer API](https://docs.portainer.io/v/ce-2.9/api/docs)
---
# Agent Instructions: Querying This Documentation
If you need additional information that is not directly available in this page, you can query the documentation dynamically by asking a question.
Perform an HTTP GET request on the current page URL with the `ask` query parameter:
```
GET https://docs.imdcinsights.com/ying-yong-zhong-xin/kai-fa-yun-wei/portainer-kuai-su-ru-men.md?ask=
```
The question should be specific, self-contained, and written in natural language.
The response will contain a direct answer to the question and relevant excerpts and sources from the documentation.
Use this mechanism when the answer is not explicitly present in the current page, you need clarification or additional context, or you want to retrieve related documentation sections.