# Nextcloud快速入门
 ### 准备[](https://support.websoft9.com/docs/nextcloud#%E5%87%86%E5%A4%87)
部署 创达睿通 提供的 Nextcloud 之后,需完成如下的准备工作:
1. 在云控制台获取您的 **服务器公网IP地址**
2. 在云控制台安全组中,确保 **Inbound(入)规则** 下的 **TCP:80** 和 **TCP:9002** 端口已经开启
3. 在服务器中查看 Nextcloud 的 **默认账号和密码**
4. 若想用域名访问 Nextcloud **域名五步设置** 过程
### Nextcloud 初始化向导[](https://support.websoft9.com/docs/nextcloud#init)
#### 详细步骤[](https://support.websoft9.com/docs/nextcloud#%E8%AF%A6%E7%BB%86%E6%AD%A5%E9%AA%A4)
1. 使用本地电脑的 Chrome 或 Firefox 浏览器访问网址:** 或 **, 进入引导首页
### 准备[](https://support.websoft9.com/docs/nextcloud#%E5%87%86%E5%A4%87)
部署 创达睿通 提供的 Nextcloud 之后,需完成如下的准备工作:
1. 在云控制台获取您的 **服务器公网IP地址**
2. 在云控制台安全组中,确保 **Inbound(入)规则** 下的 **TCP:80** 和 **TCP:9002** 端口已经开启
3. 在服务器中查看 Nextcloud 的 **默认账号和密码**
4. 若想用域名访问 Nextcloud **域名五步设置** 过程
### Nextcloud 初始化向导[](https://support.websoft9.com/docs/nextcloud#init)
#### 详细步骤[](https://support.websoft9.com/docs/nextcloud#%E8%AF%A6%E7%BB%86%E6%AD%A5%E9%AA%A4)
1. 使用本地电脑的 Chrome 或 Firefox 浏览器访问网址:** 或 **, 进入引导首页
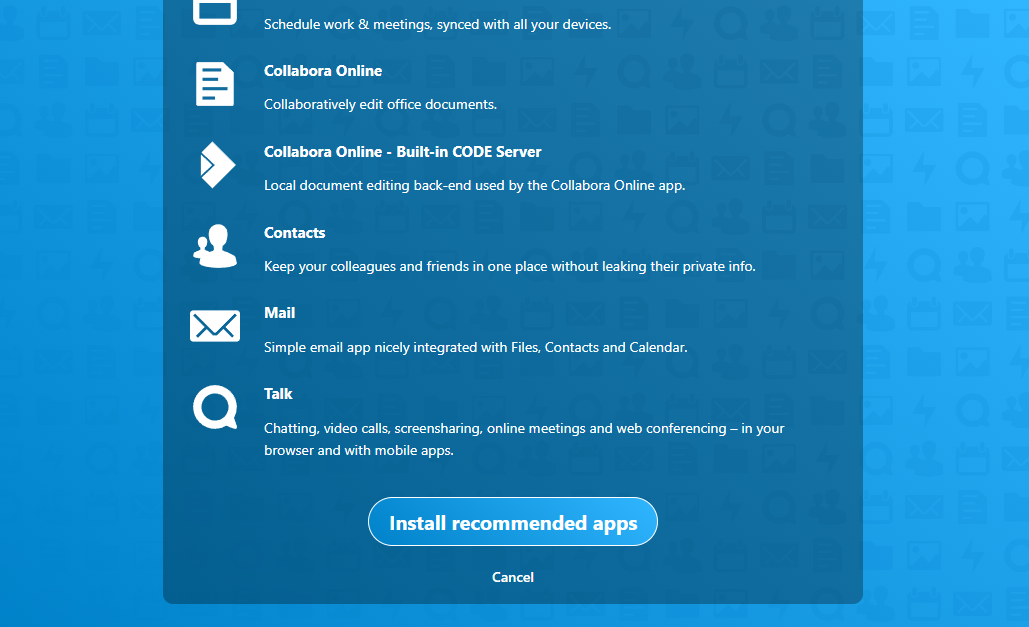
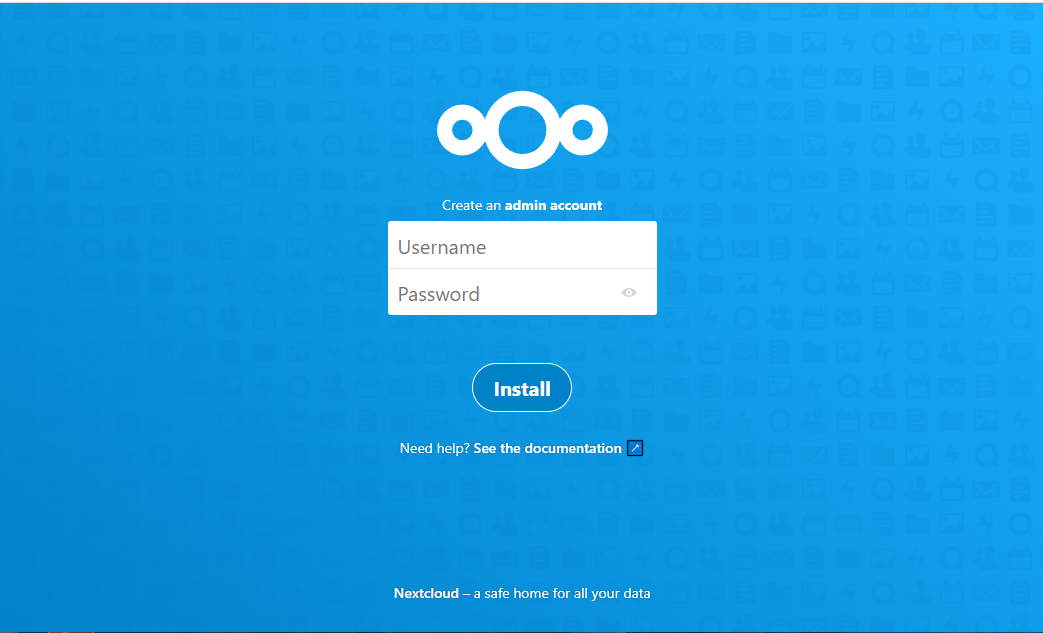 2. 设置用户名和密码并牢记,点击【安装】,安装完成后提示可继续安装插件,根据需求选择安装或者跳过
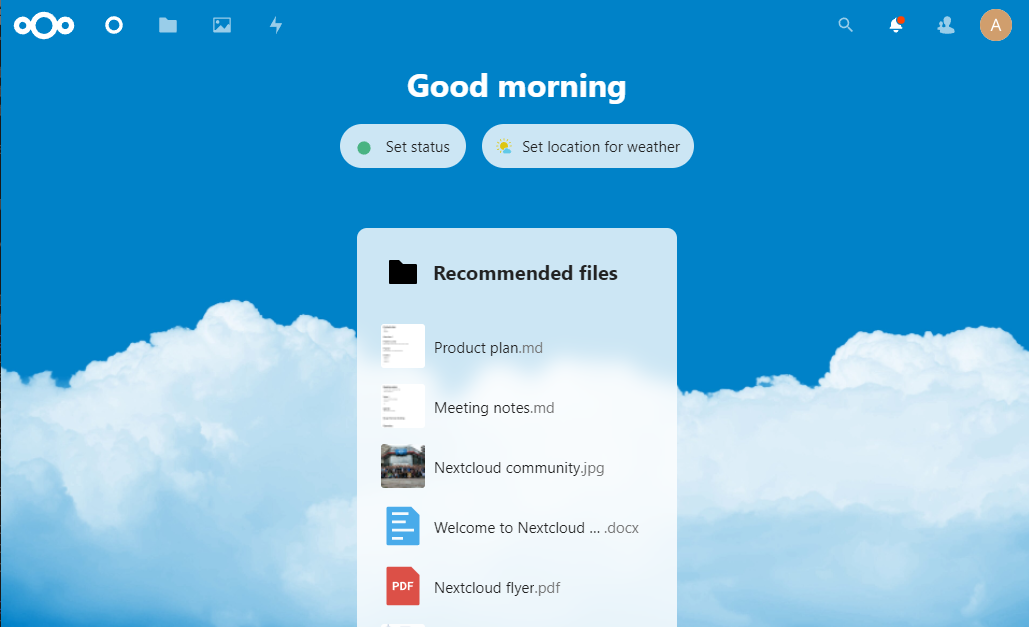
 3. 关闭弹窗,开始体验后台
 4. 进入Marketplace,扩展更多的功能
 5. 浏览器访问网址:** 查看是否安装 **OnlyOffice docs**
 6. 设置文档预览与编辑功能(非必要)
> 需要了解更多 Nextcloud 的使用,请参考官方文档:Nextcloud admin\_manual
#### 出现问题[](https://support.websoft9.com/docs/nextcloud#%E5%87%BA%E7%8E%B0%E9%97%AE%E9%A2%98)
若碰到问题,请第一时刻联系 **技术支持**。也可以先参考下面列出的问题定位或 **FAQ** 尝试快速解决问题:
**Nextcloud 是否支持采用对象存储作为网盘使用?**
支持,但需要额外配置,参考配置
**Nextcloud 是否支持在线文档编辑与预览?**
镜像预装了 OnlyOffice docs,可以通过配置实现在线文档编辑与预览,参考配置
### Nextcloud 使用入门[](https://support.websoft9.com/docs/nextcloud#nextcloud-%E4%BD%BF%E7%94%A8%E5%85%A5%E9%97%A8)
下面以 **Nextcloud 构建企业网盘系统** 作为一个任务,帮助用户快速入门:
### Nextcloud 常用操作[](https://support.websoft9.com/docs/nextcloud#nextcloud-%E5%B8%B8%E7%94%A8%E6%93%8D%E4%BD%9C)
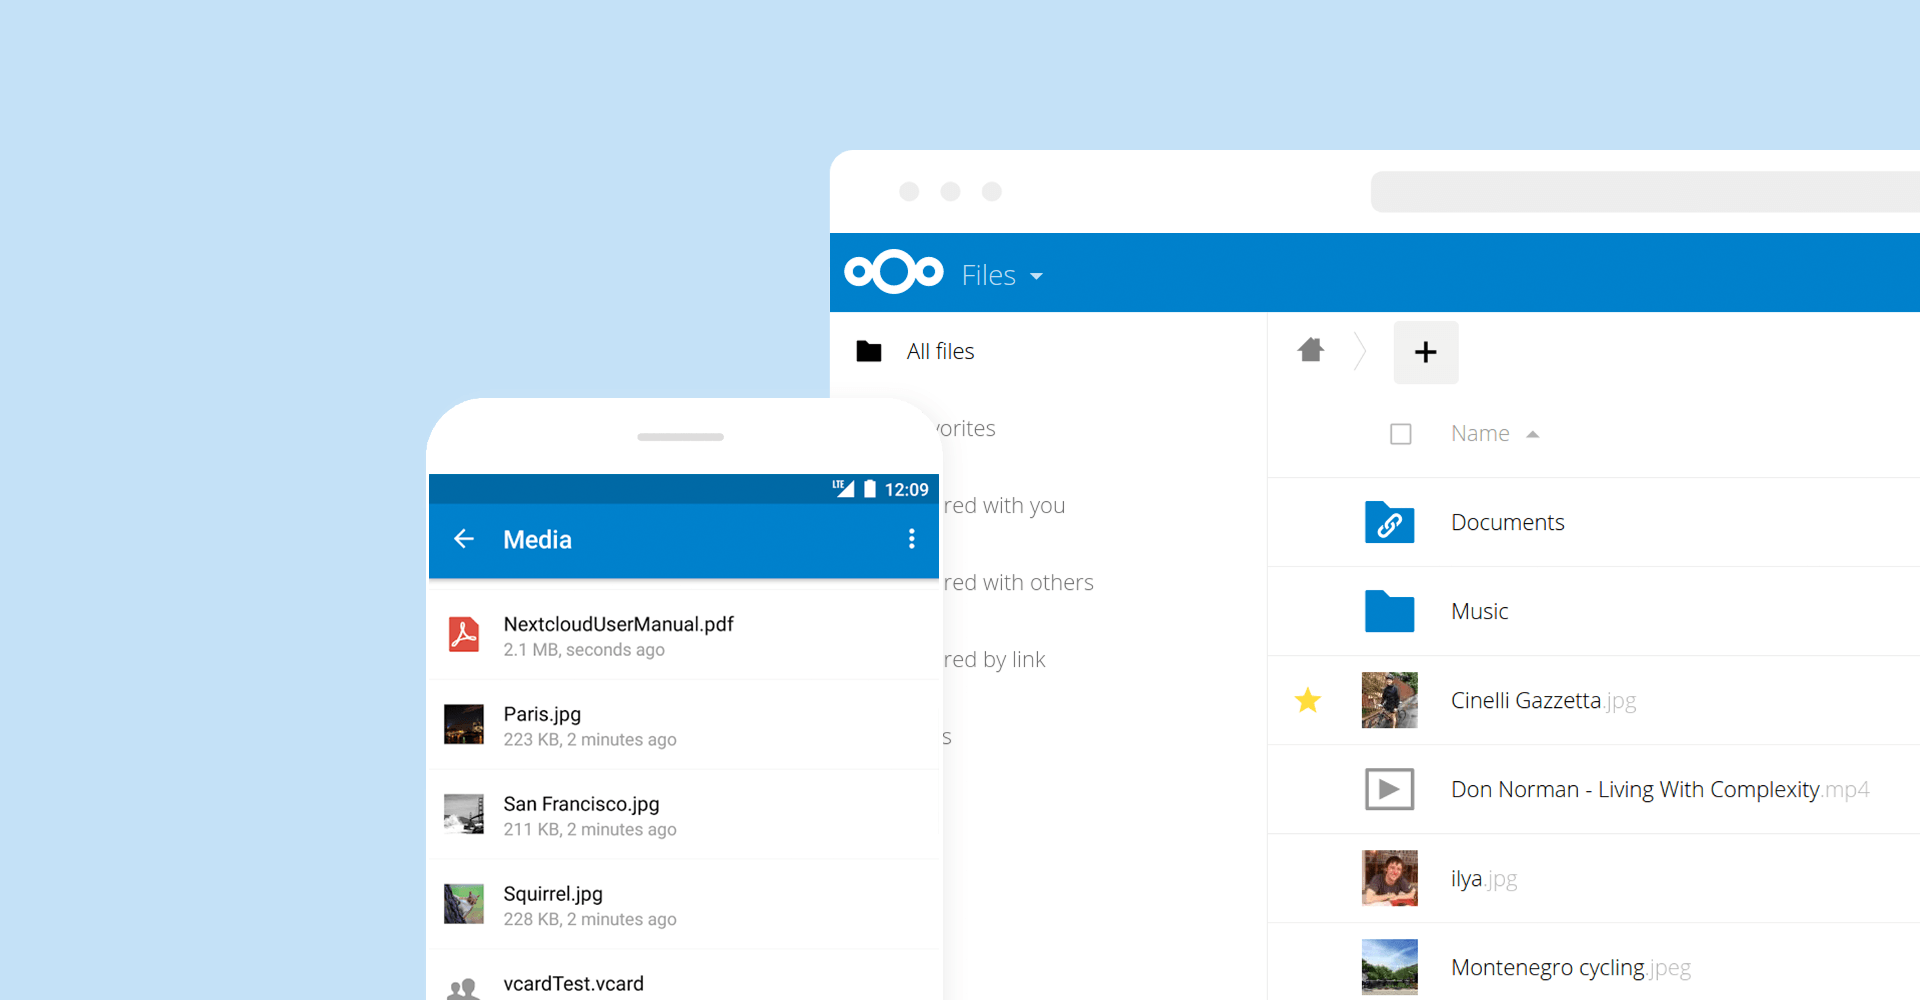
#### 使用移动端[](https://support.websoft9.com/docs/nextcloud#%E4%BD%BF%E7%94%A8%E7%A7%BB%E5%8A%A8%E7%AB%AF)
Nextcloud 支持移动端,使用步骤如下:
1. 下载移动端
2. 设置移动端到服务器的连接
#### 配置 SMTP[](https://support.websoft9.com/docs/nextcloud#smtp)
1. 在邮箱管理控制台获取 SMTP 相关参数
6. 设置文档预览与编辑功能(非必要)
> 需要了解更多 Nextcloud 的使用,请参考官方文档:Nextcloud admin\_manual
#### 出现问题[](https://support.websoft9.com/docs/nextcloud#%E5%87%BA%E7%8E%B0%E9%97%AE%E9%A2%98)
若碰到问题,请第一时刻联系 **技术支持**。也可以先参考下面列出的问题定位或 **FAQ** 尝试快速解决问题:
**Nextcloud 是否支持采用对象存储作为网盘使用?**
支持,但需要额外配置,参考配置
**Nextcloud 是否支持在线文档编辑与预览?**
镜像预装了 OnlyOffice docs,可以通过配置实现在线文档编辑与预览,参考配置
### Nextcloud 使用入门[](https://support.websoft9.com/docs/nextcloud#nextcloud-%E4%BD%BF%E7%94%A8%E5%85%A5%E9%97%A8)
下面以 **Nextcloud 构建企业网盘系统** 作为一个任务,帮助用户快速入门:
### Nextcloud 常用操作[](https://support.websoft9.com/docs/nextcloud#nextcloud-%E5%B8%B8%E7%94%A8%E6%93%8D%E4%BD%9C)
#### 使用移动端[](https://support.websoft9.com/docs/nextcloud#%E4%BD%BF%E7%94%A8%E7%A7%BB%E5%8A%A8%E7%AB%AF)
Nextcloud 支持移动端,使用步骤如下:
1. 下载移动端
2. 设置移动端到服务器的连接
#### 配置 SMTP[](https://support.websoft9.com/docs/nextcloud#smtp)
1. 在邮箱管理控制台获取 SMTP 相关参数
 2. 点击【其他设置】>【电子邮件服务器】,依次填写 SMTP 信息
* 发送模式选择“SMTP”,加密方式选择“SSL/TLS”;
* 输入发送方邮箱地址;
* 认证方式选择“登录”,并勾选“需要认证”选项;
* 输入SMTP服务器地址和SMTP服务器的端口号;
* 输入和发件人邮箱一致的邮箱地址;
* 输入该邮箱地址的SMTP服务的授权码或密码;
* 存储凭据;
2. 点击【其他设置】>【电子邮件服务器】,依次填写 SMTP 信息
* 发送模式选择“SMTP”,加密方式选择“SSL/TLS”;
* 输入发送方邮箱地址;
* 认证方式选择“登录”,并勾选“需要认证”选项;
* 输入SMTP服务器地址和SMTP服务器的端口号;
* 输入和发件人邮箱一致的邮箱地址;
* 输入该邮箱地址的SMTP服务的授权码或密码;
* 存储凭据;
 3. 点击“发送邮件”即可测试SMTP是否设置正确。
#### 域名额外配置(修改 URL)[](https://support.websoft9.com/docs/nextcloud#dns)
**域名五步设置** 完成后,需设置 Nextcloud 的 URL:
1. 修改 Nextcloud 配置文件 中的域名值
```
'overwrite.cli.url' => 'nextcloud.yourdomain.com', # 修改为新域名
```
2. 重启服务后生效
#### 设置语言[](https://support.websoft9.com/docs/nextcloud#%E8%AE%BE%E7%BD%AE%E8%AF%AD%E8%A8%80)
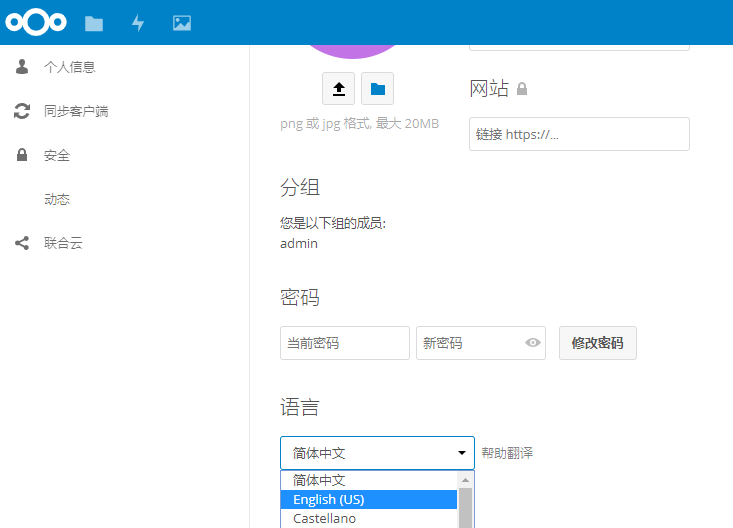
登录 Nextcloud,在后台 【个人】>【个人信息】中设置语言
#### 在线安装扩展[](https://support.websoft9.com/docs/nextcloud#%E5%9C%A8%E7%BA%BF%E5%AE%89%E8%A3%85%E6%89%A9%E5%B1%95)
Nextcloud 后台集成了 Marketplace 大量的扩展(也叫apps),下面介绍如何安装它们
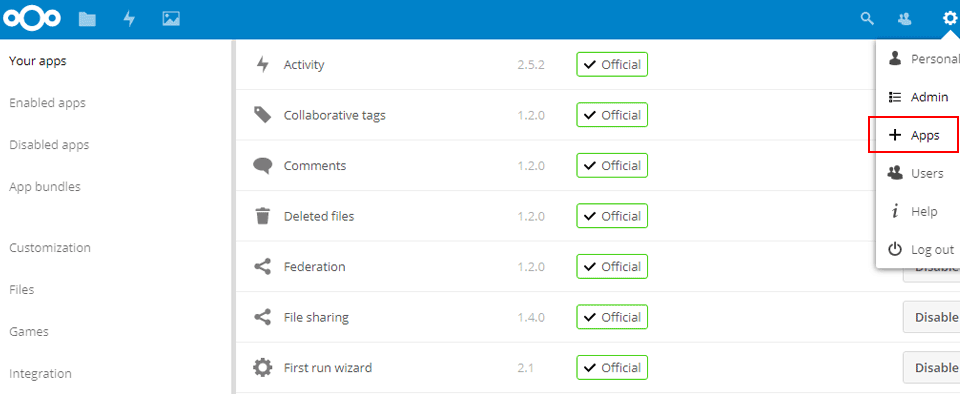
1. 登录 Nextcloud,在后台 【应用】>【应用软件包】中寻找所需的应用
3. 点击“发送邮件”即可测试SMTP是否设置正确。
#### 域名额外配置(修改 URL)[](https://support.websoft9.com/docs/nextcloud#dns)
**域名五步设置** 完成后,需设置 Nextcloud 的 URL:
1. 修改 Nextcloud 配置文件 中的域名值
```
'overwrite.cli.url' => 'nextcloud.yourdomain.com', # 修改为新域名
```
2. 重启服务后生效
#### 设置语言[](https://support.websoft9.com/docs/nextcloud#%E8%AE%BE%E7%BD%AE%E8%AF%AD%E8%A8%80)
登录 Nextcloud,在后台 【个人】>【个人信息】中设置语言

#### 在线安装扩展[](https://support.websoft9.com/docs/nextcloud#%E5%9C%A8%E7%BA%BF%E5%AE%89%E8%A3%85%E6%89%A9%E5%B1%95)
Nextcloud 后台集成了 Marketplace 大量的扩展(也叫apps),下面介绍如何安装它们
1. 登录 Nextcloud,在后台 【应用】>【应用软件包】中寻找所需的应用
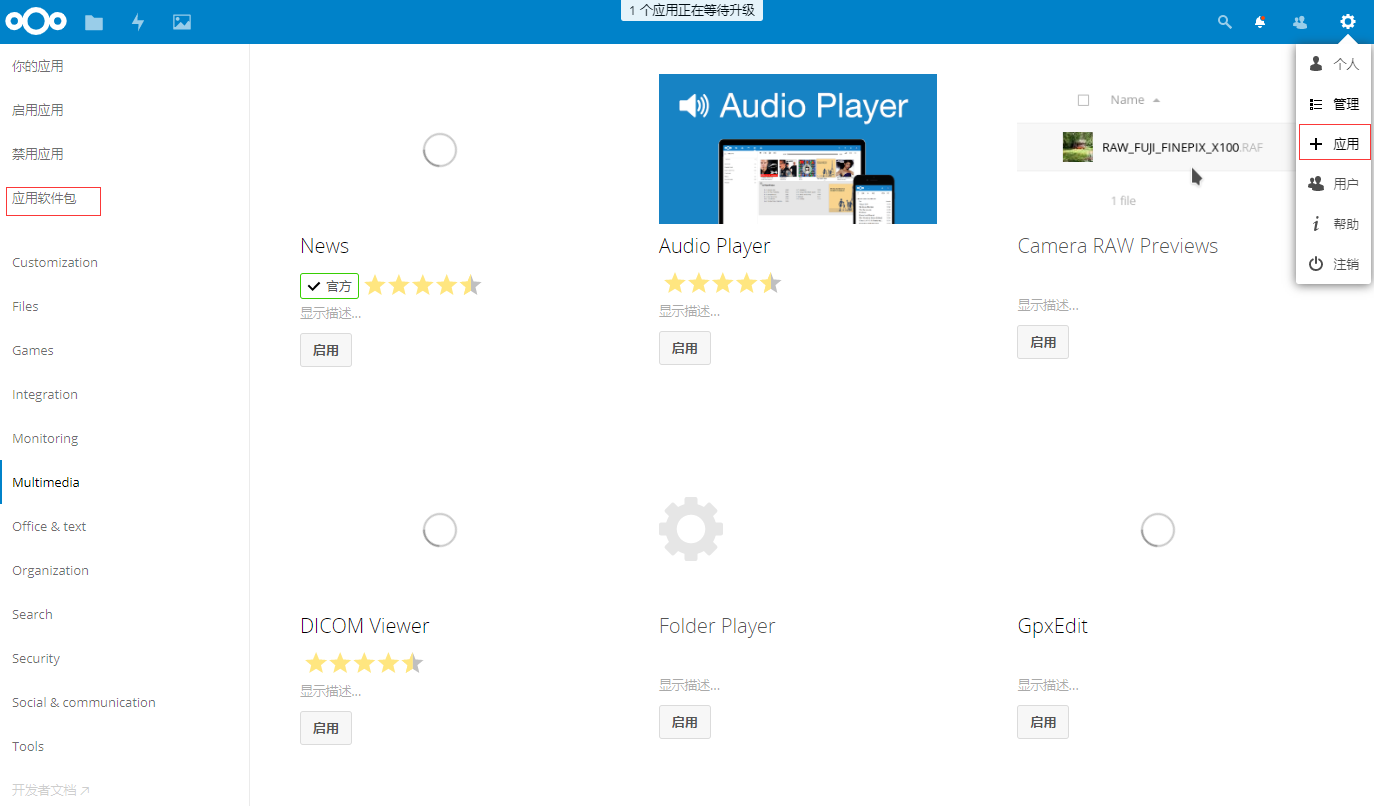 2. 在线安装它
#### 手工安装扩展[](https://support.websoft9.com/docs/nextcloud#minstallplugin)
网络问题可能会导致无法在线安装扩展,此时就需要手工安装(下面以 ONLYOFFICE 为例):
1. 到 Nextcloud 官方应用商店下载扩展
2. 下载并解压,通过FTP上传到服务器 Nextcloud 应用目录:/var/lib/docker/volumes/nextcloud\_nextcloud/\_data/apps,并通过chown 命令,改变 onlyoffice 目录的拥有者和关联组用户为 www-data
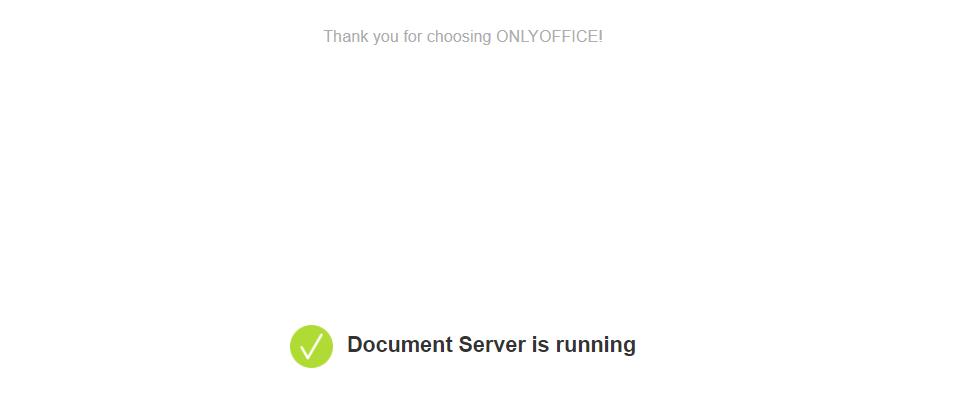
3. 登录 Nextcloud 后台,进入应用中心,启用 ONLYOFFICE 即可进入下一步操作,开启文档在线预览和编辑
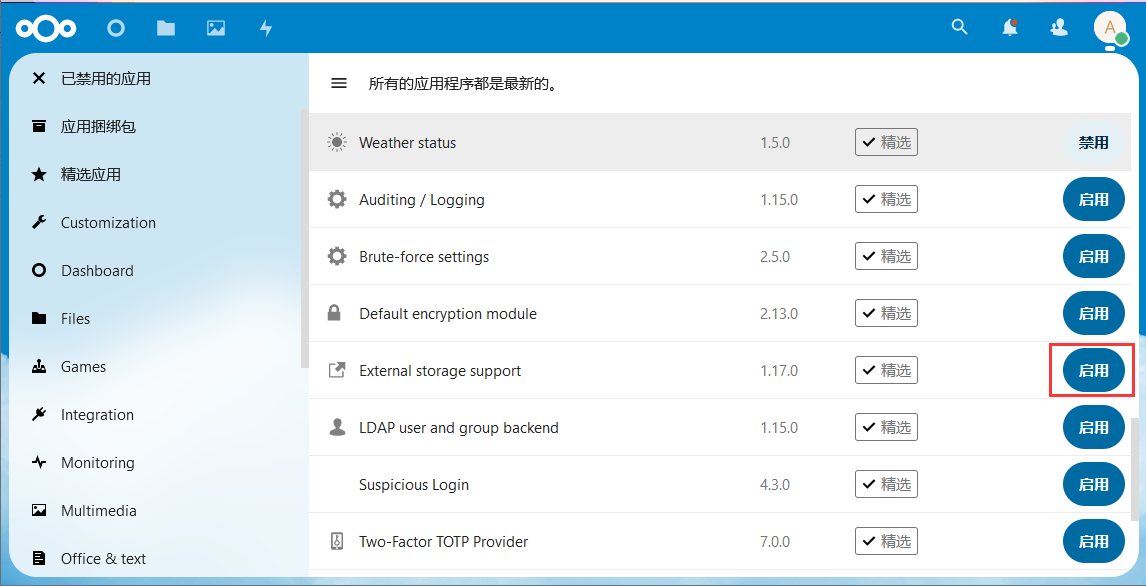
#### 连接外部存储[](https://support.websoft9.com/docs/nextcloud#oss)
Nextcloud 支持多种流行的企业存储服务,具体使用步骤如下:
1. 登录 Nextcloud 后台,通过 **应用** 管理,启用 **External storage support** 扩展
2. 在线安装它
#### 手工安装扩展[](https://support.websoft9.com/docs/nextcloud#minstallplugin)
网络问题可能会导致无法在线安装扩展,此时就需要手工安装(下面以 ONLYOFFICE 为例):
1. 到 Nextcloud 官方应用商店下载扩展
2. 下载并解压,通过FTP上传到服务器 Nextcloud 应用目录:/var/lib/docker/volumes/nextcloud\_nextcloud/\_data/apps,并通过chown 命令,改变 onlyoffice 目录的拥有者和关联组用户为 www-data
3. 登录 Nextcloud 后台,进入应用中心,启用 ONLYOFFICE 即可进入下一步操作,开启文档在线预览和编辑
#### 连接外部存储[](https://support.websoft9.com/docs/nextcloud#oss)
Nextcloud 支持多种流行的企业存储服务,具体使用步骤如下:
1. 登录 Nextcloud 后台,通过 **应用** 管理,启用 **External storage support** 扩展
 2. 打开:【管理设置】>【外部存储】>【Add storage】>【External Storage】,选择一个外部存储服务。选择S3能兼容目前大多数对象存储工具,如S3,OSS,OBS等。
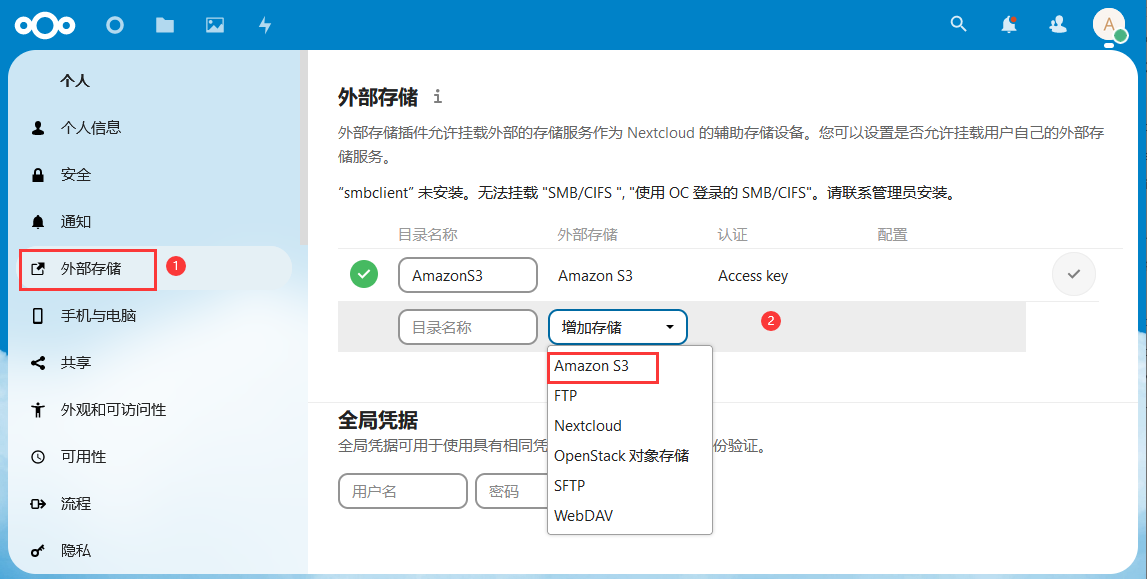 3. 根据实际情况配置,连接到相应的对象存储。使用云平台的秘钥对连接成功后,会在 Nextcloud 中生成对应的外部存储目录。
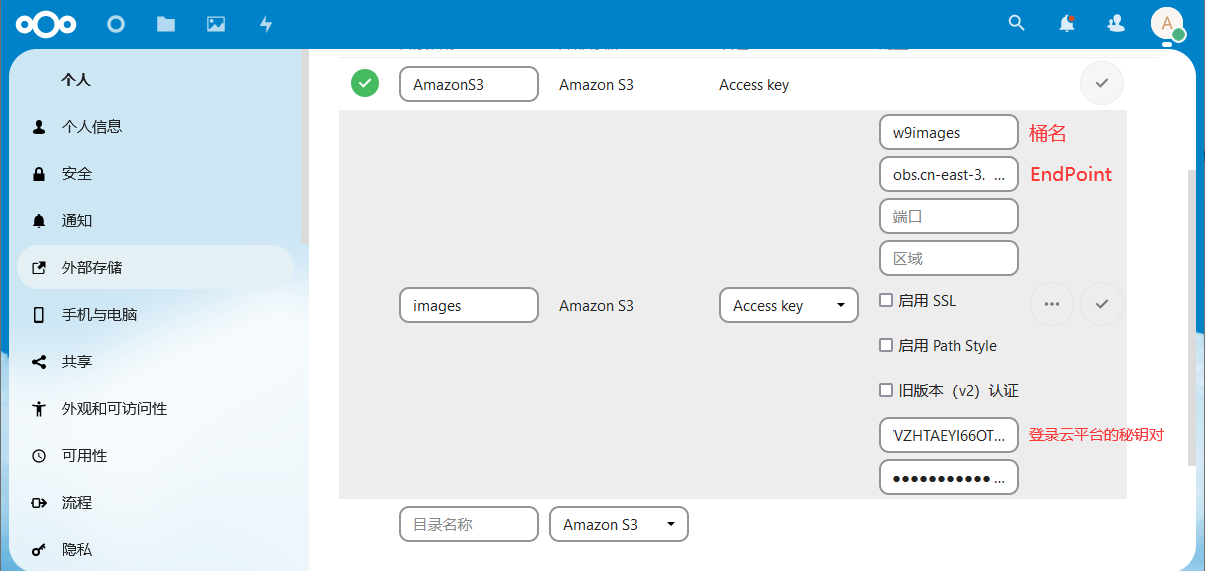 更多详情参考官方文档:External Storage
#### 数据转移[](https://support.websoft9.com/docs/nextcloud#%E6%95%B0%E6%8D%AE%E8%BD%AC%E7%A7%BB)
Nextcloud 的程序和数据文件默认均存在系统盘,你要转移到数据盘(或对象存储),步骤如下:
**转移到对象存储**[****](https://support.websoft9.com/docs/nextcloud#%E8%BD%AC%E7%A7%BB%E5%88%B0%E5%AF%B9%E8%B1%A1%E5%AD%98%E5%82%A8)
转移到对象存储有四个要点:对象存储挂载到服务器,Nextcloud 数据文件备份与复制,docker-compose 文件 volume 挂载更改和重建索引。
具体步骤如下:
1. 将 Nextcloud 数据目录复制一份到目录:*/data/backup/nextcloud*
2. 在服务器所在的云平台上购买对象存储,新建一个 **bucket**
3. 将对象存储的 bucket **mount** 到 Nextcloud 数据目录 */data/app/nextcloud/ossdata/*,并设置开机自动挂载。以阿里云为例:
在/etc/init.d/目录下建立文件ossfs,内容如下:
```
#! /bin/bash
#
# ossfs Automount Aliyun OSS Bucket in the specified direcotry.
#
# chkconfig: 2345 90 10
# description: Activates/Deactivates ossfs configured to start at boot time.
ossfs Image /data/app/nextcloud/ossdata/ -ourl=http://oss-cn-hangzhou.aliyuncs.com -o allow_other -o nonempty -o mp_umask=007 -o uid=48 -o gid=48
```
> uid 对应着容器中用户的 uid,解决了权限的问题。
4. 将 Nextcloud 备份文件拷贝到 Nextcloud 数据目录 */data/app/nextcloud/ossdata/*
5. 修改 docker-compose.yml 文件中 Nextcloud 数据路径到 */data/app/nextcloud/ossdata/*,docker compose up 后生效。
6. 连接到 Nextcloud 容器,cd 到 Nextcloud 根目录,重建 Nextcloud 索引
```
occ files:scan --all
```
**转移到数据盘**[****](https://support.websoft9.com/docs/nextcloud#%E8%BD%AC%E7%A7%BB%E5%88%B0%E6%95%B0%E6%8D%AE%E7%9B%98)
转移到数据盘的操作与转移到对象存储非常类似,只是 2-3 步骤操作略有差异。
> 以上两种数据转移方案中,**mount** 操作对新手来说是几乎是不可能独立完成的任务。另外,如果转移的数据超过10G,会存在拷贝失败的风险
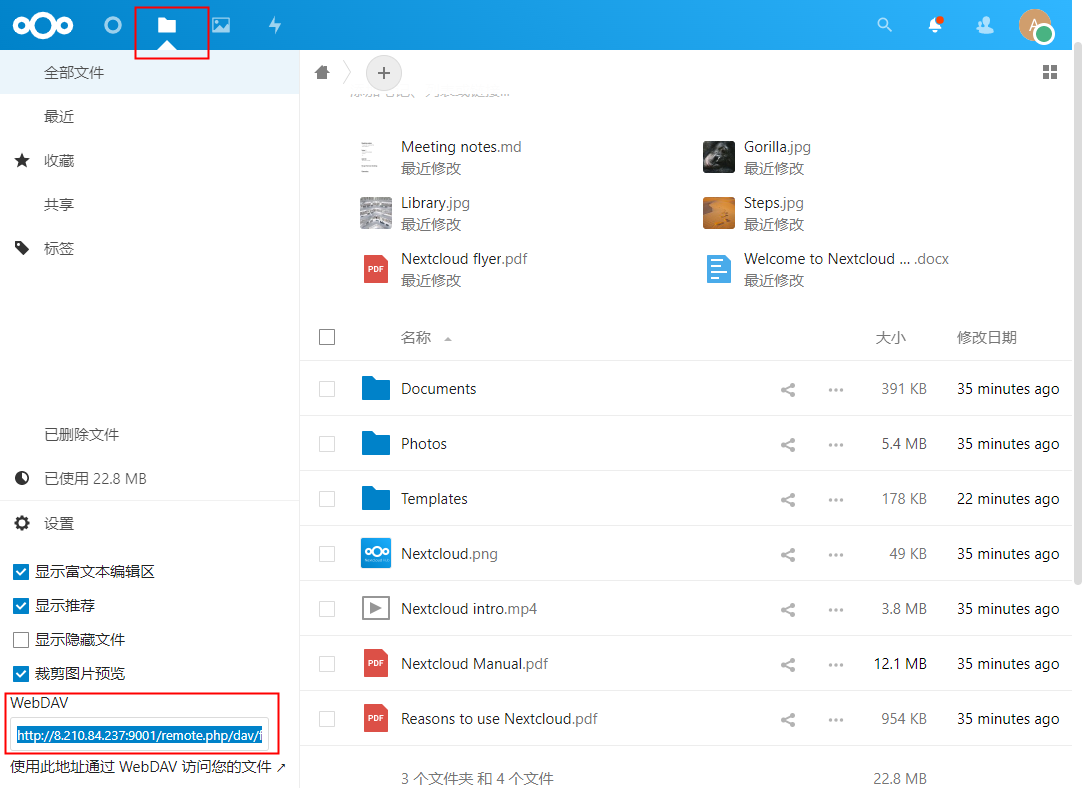
#### 通过 WebDAV 连接 NextCloud[](https://support.websoft9.com/docs/nextcloud#%E9%80%9A%E8%BF%87-webdav-%E8%BF%9E%E6%8E%A5-nextcloud)
NextCloud 支持 WebDAV 协议,用户可以通过 WebDAV 来连接并同步文件,比如在 Windows10 系统映射磁盘到 NextCloud,用于本地访问云盘文档。
1. 获取 WebDav 连接 URL: 登录NextCloud,点击【文件】-【设置】获取 URL
> 注意:每个用户都有自己的 URL,使用对应的 URL 和用户名登录才能正确访问文件
2. 配置本地连接:在 Windows10 【运行】regedit 命令,进入注册表,修改注册表项 HKEY\_LOCAL\_MACHINE\SYSTEM\CurrentControlSet\Services\WebClient\Parameters,将 BasicAuthLevel 值设为 2 ,将 FileSizeLimitInBytes 值改成十进制 50000000
3. 重启本地服务:打开 Windows PowerShell(管理员) 工具,输入命令 net start webclient 重启 webclient 服务
4. 映射本地磁盘:右击【我的电脑】,选择【映射网络驱动器】, 复制第1步中的URL,确定。在弹出的登录界面,输入NextCloud 登录账号,完成连接。
5. 完成上述操作,进入【我的电脑】,可以看见新添加的【网络位置盘符】,双击打开即可访问 NextCloud 远程文件。
### Nextcloud 参数[](https://support.websoft9.com/docs/nextcloud#parameter)
Nextcloud 应用中包含 Nginx, Docker, MySQL, phpMyAdmin, ONLYOFFICE Docs 等组件,可通过 **通用参数表** 查看路径、服务、端口等参数。
通过运行 `docker ps`,可以查看到 Nextcloud 运行时所有的 Container:
```
CONTAINER ID IMAGE COMMAND CREATED STATUS PORTS NAMES
c8a5fae52a35 onlyoffice/documentserver:latest "/app/ds/run-documen…" 59 minutes ago Up 59 minutes 443/tcp, 0.0.0.0:9002->80/tcp, :::9002->80/tcp onlyofficedocs
5523e9c3a9bd phpmyadmin:latest "/docker-entrypoint.…" 59 minutes ago Up 59 minutes 0.0.0.0:9090->80/tcp, :::9090->80/tcp phpmyadmin
6ecb1771a868 nextcloud:latest "/entrypoint.sh apac…" About an hour ago Up About an hour 0.0.0.0:9001->80/tcp, :::9001->80/tcp nextcloud
ae358a9bb912 mysql:8.0 "docker-entrypoint.s…" About an hour ago Up About an hour 0.0.0.0:3306->3306/tcp, :::3306->3306/tcp, 33060/tcp nextcloud-db
```
#### 路径[](https://support.websoft9.com/docs/nextcloud#path)
Nextcloud 安装目录: */data/apps/nextcloud*\
Nextcloud 数据目录: */data/apps/nextcloud/data/nextcloud-data*\
Nextcloud 站点目录: */data/apps/nextcloud/data/nextcloud*\
Nextcloud 配置文件: */data/apps/nextcloud/data/nextcloud/config/config.php*\
Onlyofficedocs 安装目录: */data/apps/onlyofficedocs*
#### 端口[](https://support.websoft9.com/docs/nextcloud#port)
| 端口号 | 用途 | 必要性 |
| ---- | ------------------------- | --- |
| 9002 | OnlyOffice docs on Docker | 可选 |
#### 版本[](https://support.websoft9.com/docs/nextcloud#version)
```
docker exec -i nextcloud cat version.php |grep OC_VersionString |awk -F "'" '{print $2}'
```
#### 服务[](https://support.websoft9.com/docs/nextcloud#service)
```
sudo docker start | stop | restart | stats nextcloud
sudo docker start | stop | restart | stats nextcloud-db
sudo docker start | stop | restart | stats phpmyadmin
sudo docker start | stop | restart | stats onlyofficedocs
```
#### 命令行[](https://support.websoft9.com/docs/nextcloud#cli)
occ 命令是 Nextcloud 的命令行界面。 OCC 可安装和升级 Nextcloud,管理用户,加密,密码管理,LDAP设置等。
```
sudo -u www-data php occ
Nextcloud version 19.0.0
Usage:
command [options] [arguments]
Options:
-h, --help Display this help message
-q, --quiet Do not output any message
-V, --version Display this application version
--ansi Force ANSI output
--no-ansi Disable ANSI output
-n, --no-interaction Do not ask any interactive question
--no-warnings Skip global warnings, show command output only
-v|vv|vvv, --verbose Increase the verbosity of messages: 1 for normal output,
2 for more verbose output and 3 for debug
Available commands:
check check dependencies of the server
environment
help Displays help for a command
list Lists commands
status show some status information
upgrade run upgrade routines after installation of
a new release. The release has to be
installed before.
```
#### API[](https://support.websoft9.com/docs/nextcloud#api)
[Basic APIs](https://docs.nextcloud.com/server/latest/developer_manual/client_apis/WebDAV/basic.html)
---
# Agent Instructions: Querying This Documentation
If you need additional information that is not directly available in this page, you can query the documentation dynamically by asking a question.
Perform an HTTP GET request on the current page URL with the `ask` query parameter:
```
GET https://docs.imdcinsights.com/ying-yong-zhong-xin/xie-zuo-yu-sheng-chan-li/nextcloud-kuai-su-ru-men.md?ask=
```
The question should be specific, self-contained, and written in natural language.
The response will contain a direct answer to the question and relevant excerpts and sources from the documentation.
Use this mechanism when the answer is not explicitly present in the current page, you need clarification or additional context, or you want to retrieve related documentation sections.
更多详情参考官方文档:External Storage
#### 数据转移[](https://support.websoft9.com/docs/nextcloud#%E6%95%B0%E6%8D%AE%E8%BD%AC%E7%A7%BB)
Nextcloud 的程序和数据文件默认均存在系统盘,你要转移到数据盘(或对象存储),步骤如下:
**转移到对象存储**[****](https://support.websoft9.com/docs/nextcloud#%E8%BD%AC%E7%A7%BB%E5%88%B0%E5%AF%B9%E8%B1%A1%E5%AD%98%E5%82%A8)
转移到对象存储有四个要点:对象存储挂载到服务器,Nextcloud 数据文件备份与复制,docker-compose 文件 volume 挂载更改和重建索引。
具体步骤如下:
1. 将 Nextcloud 数据目录复制一份到目录:*/data/backup/nextcloud*
2. 在服务器所在的云平台上购买对象存储,新建一个 **bucket**
3. 将对象存储的 bucket **mount** 到 Nextcloud 数据目录 */data/app/nextcloud/ossdata/*,并设置开机自动挂载。以阿里云为例:
在/etc/init.d/目录下建立文件ossfs,内容如下:
```
#! /bin/bash
#
# ossfs Automount Aliyun OSS Bucket in the specified direcotry.
#
# chkconfig: 2345 90 10
# description: Activates/Deactivates ossfs configured to start at boot time.
ossfs Image /data/app/nextcloud/ossdata/ -ourl=http://oss-cn-hangzhou.aliyuncs.com -o allow_other -o nonempty -o mp_umask=007 -o uid=48 -o gid=48
```
> uid 对应着容器中用户的 uid,解决了权限的问题。
4. 将 Nextcloud 备份文件拷贝到 Nextcloud 数据目录 */data/app/nextcloud/ossdata/*
5. 修改 docker-compose.yml 文件中 Nextcloud 数据路径到 */data/app/nextcloud/ossdata/*,docker compose up 后生效。
6. 连接到 Nextcloud 容器,cd 到 Nextcloud 根目录,重建 Nextcloud 索引
```
occ files:scan --all
```
**转移到数据盘**[****](https://support.websoft9.com/docs/nextcloud#%E8%BD%AC%E7%A7%BB%E5%88%B0%E6%95%B0%E6%8D%AE%E7%9B%98)
转移到数据盘的操作与转移到对象存储非常类似,只是 2-3 步骤操作略有差异。
> 以上两种数据转移方案中,**mount** 操作对新手来说是几乎是不可能独立完成的任务。另外,如果转移的数据超过10G,会存在拷贝失败的风险
#### 通过 WebDAV 连接 NextCloud[](https://support.websoft9.com/docs/nextcloud#%E9%80%9A%E8%BF%87-webdav-%E8%BF%9E%E6%8E%A5-nextcloud)
NextCloud 支持 WebDAV 协议,用户可以通过 WebDAV 来连接并同步文件,比如在 Windows10 系统映射磁盘到 NextCloud,用于本地访问云盘文档。
1. 获取 WebDav 连接 URL: 登录NextCloud,点击【文件】-【设置】获取 URL
> 注意:每个用户都有自己的 URL,使用对应的 URL 和用户名登录才能正确访问文件

2. 配置本地连接:在 Windows10 【运行】regedit 命令,进入注册表,修改注册表项 HKEY\_LOCAL\_MACHINE\SYSTEM\CurrentControlSet\Services\WebClient\Parameters,将 BasicAuthLevel 值设为 2 ,将 FileSizeLimitInBytes 值改成十进制 50000000
3. 重启本地服务:打开 Windows PowerShell(管理员) 工具,输入命令 net start webclient 重启 webclient 服务
4. 映射本地磁盘:右击【我的电脑】,选择【映射网络驱动器】, 复制第1步中的URL,确定。在弹出的登录界面,输入NextCloud 登录账号,完成连接。
5. 完成上述操作,进入【我的电脑】,可以看见新添加的【网络位置盘符】,双击打开即可访问 NextCloud 远程文件。
### Nextcloud 参数[](https://support.websoft9.com/docs/nextcloud#parameter)
Nextcloud 应用中包含 Nginx, Docker, MySQL, phpMyAdmin, ONLYOFFICE Docs 等组件,可通过 **通用参数表** 查看路径、服务、端口等参数。
通过运行 `docker ps`,可以查看到 Nextcloud 运行时所有的 Container:
```
CONTAINER ID IMAGE COMMAND CREATED STATUS PORTS NAMES
c8a5fae52a35 onlyoffice/documentserver:latest "/app/ds/run-documen…" 59 minutes ago Up 59 minutes 443/tcp, 0.0.0.0:9002->80/tcp, :::9002->80/tcp onlyofficedocs
5523e9c3a9bd phpmyadmin:latest "/docker-entrypoint.…" 59 minutes ago Up 59 minutes 0.0.0.0:9090->80/tcp, :::9090->80/tcp phpmyadmin
6ecb1771a868 nextcloud:latest "/entrypoint.sh apac…" About an hour ago Up About an hour 0.0.0.0:9001->80/tcp, :::9001->80/tcp nextcloud
ae358a9bb912 mysql:8.0 "docker-entrypoint.s…" About an hour ago Up About an hour 0.0.0.0:3306->3306/tcp, :::3306->3306/tcp, 33060/tcp nextcloud-db
```
#### 路径[](https://support.websoft9.com/docs/nextcloud#path)
Nextcloud 安装目录: */data/apps/nextcloud*\
Nextcloud 数据目录: */data/apps/nextcloud/data/nextcloud-data*\
Nextcloud 站点目录: */data/apps/nextcloud/data/nextcloud*\
Nextcloud 配置文件: */data/apps/nextcloud/data/nextcloud/config/config.php*\
Onlyofficedocs 安装目录: */data/apps/onlyofficedocs*
#### 端口[](https://support.websoft9.com/docs/nextcloud#port)
| 端口号 | 用途 | 必要性 |
| ---- | ------------------------- | --- |
| 9002 | OnlyOffice docs on Docker | 可选 |
#### 版本[](https://support.websoft9.com/docs/nextcloud#version)
```
docker exec -i nextcloud cat version.php |grep OC_VersionString |awk -F "'" '{print $2}'
```
#### 服务[](https://support.websoft9.com/docs/nextcloud#service)
```
sudo docker start | stop | restart | stats nextcloud
sudo docker start | stop | restart | stats nextcloud-db
sudo docker start | stop | restart | stats phpmyadmin
sudo docker start | stop | restart | stats onlyofficedocs
```
#### 命令行[](https://support.websoft9.com/docs/nextcloud#cli)
occ 命令是 Nextcloud 的命令行界面。 OCC 可安装和升级 Nextcloud,管理用户,加密,密码管理,LDAP设置等。
```
sudo -u www-data php occ
Nextcloud version 19.0.0
Usage:
command [options] [arguments]
Options:
-h, --help Display this help message
-q, --quiet Do not output any message
-V, --version Display this application version
--ansi Force ANSI output
--no-ansi Disable ANSI output
-n, --no-interaction Do not ask any interactive question
--no-warnings Skip global warnings, show command output only
-v|vv|vvv, --verbose Increase the verbosity of messages: 1 for normal output,
2 for more verbose output and 3 for debug
Available commands:
check check dependencies of the server
environment
help Displays help for a command
list Lists commands
status show some status information
upgrade run upgrade routines after installation of
a new release. The release has to be
installed before.
```
#### API[](https://support.websoft9.com/docs/nextcloud#api)
[Basic APIs](https://docs.nextcloud.com/server/latest/developer_manual/client_apis/WebDAV/basic.html)
---
# Agent Instructions: Querying This Documentation
If you need additional information that is not directly available in this page, you can query the documentation dynamically by asking a question.
Perform an HTTP GET request on the current page URL with the `ask` query parameter:
```
GET https://docs.imdcinsights.com/ying-yong-zhong-xin/xie-zuo-yu-sheng-chan-li/nextcloud-kuai-su-ru-men.md?ask=
```
The question should be specific, self-contained, and written in natural language.
The response will contain a direct answer to the question and relevant excerpts and sources from the documentation.
Use this mechanism when the answer is not explicitly present in the current page, you need clarification or additional context, or you want to retrieve related documentation sections.