> For the complete documentation index, see [llms.txt](https://docs.imdcinsights.com/llms.txt). Markdown versions of documentation pages are available by appending `.md` to page URLs; this page is available as [Markdown](https://docs.imdcinsights.com/ying-yong-zhong-xin/xie-zuo-yu-sheng-chan-li/seafile-kuai-su-ru-men.md).
# Seafile快速入门
 ### 准备[](https://support.websoft9.com/docs/seafile#%E5%87%86%E5%A4%87)
部署 创达睿通 提供的 Seafile 之后,需完成如下的准备工作:
1. 在云控制台获取您的 **服务器公网IP地址**
2. 在云控制台安全组中,确保 **Inbound(入)规则** 下的 **TCP:80** 和 **TCP:9002** 端口已经开启
3. 在服务器中查看 Seafile 的 **默认账号和密码**
4. 若想用域名访问 Seafile **域名五步设置** 过程
### Seafile 初始化向导[](https://support.websoft9.com/docs/seafile#init)
#### 详细步骤[](https://support.websoft9.com/docs/seafile#%E8%AF%A6%E7%BB%86%E6%AD%A5%E9%AA%A4)
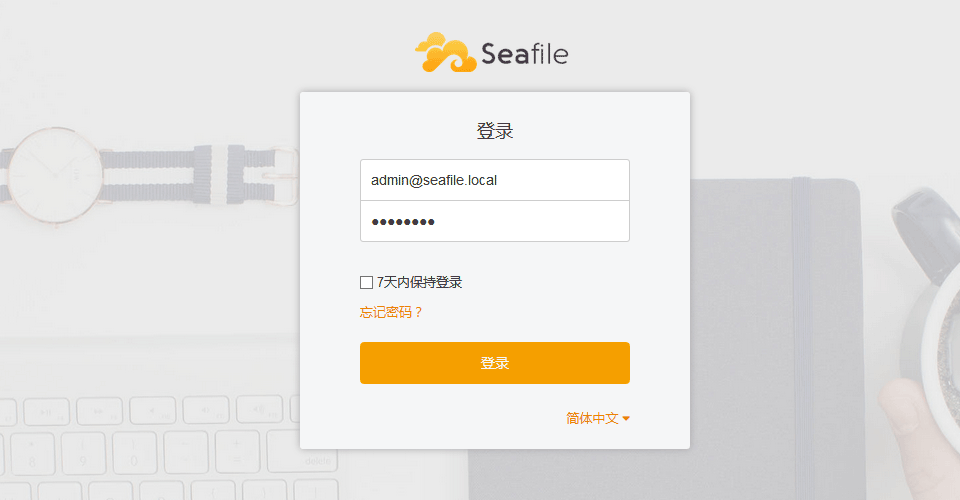
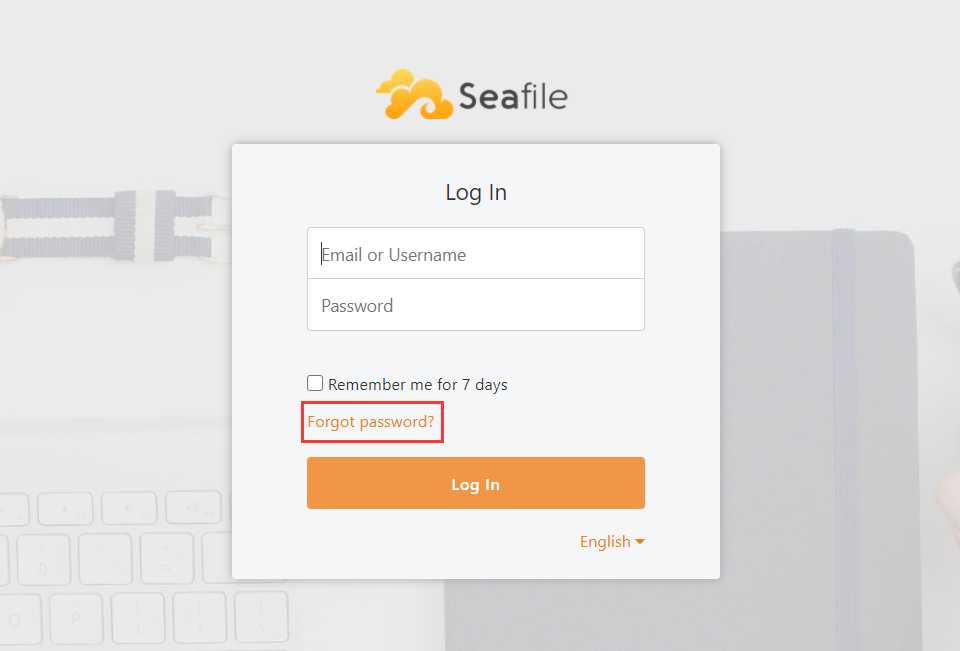
1. 使用本地电脑浏览器访问网址:** 或 **, 进入Seafile 登录页面
### 准备[](https://support.websoft9.com/docs/seafile#%E5%87%86%E5%A4%87)
部署 创达睿通 提供的 Seafile 之后,需完成如下的准备工作:
1. 在云控制台获取您的 **服务器公网IP地址**
2. 在云控制台安全组中,确保 **Inbound(入)规则** 下的 **TCP:80** 和 **TCP:9002** 端口已经开启
3. 在服务器中查看 Seafile 的 **默认账号和密码**
4. 若想用域名访问 Seafile **域名五步设置** 过程
### Seafile 初始化向导[](https://support.websoft9.com/docs/seafile#init)
#### 详细步骤[](https://support.websoft9.com/docs/seafile#%E8%AF%A6%E7%BB%86%E6%AD%A5%E9%AA%A4)
1. 使用本地电脑浏览器访问网址:** 或 **, 进入Seafile 登录页面
 2. 输入用户名和密码,登录到Seafile后台管理界面
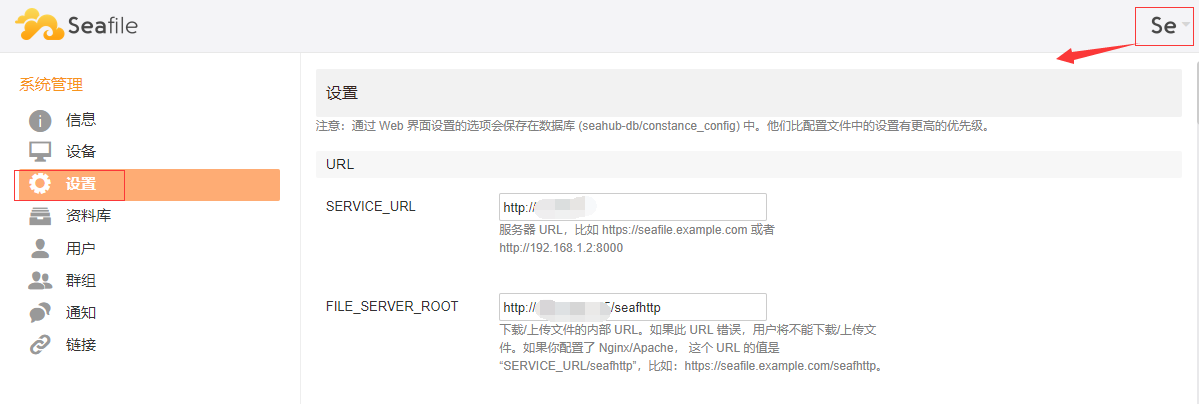
 3. 设置(检查) Seafile 的真实主机地址(**必选项,否则无法使用文件上传功能**)
* SERVICE\_URL:**
* FILE\_SERVER\_ROOT:**
4. 开始使用 Seafile 全面友好的功能吧
5. [导入](https://support.websoft9.com/docs/seafile#importlicense)授权文件 (仅 Seafile 企业版需要)
> 需要了解更多Seafile的使用,请参考:《Seafile 用户手册》 和 《Seafile 服务器手册》
#### 出现问题?[](https://support.websoft9.com/docs/seafile#%E5%87%BA%E7%8E%B0%E9%97%AE%E9%A2%98)
若碰到问题,请第一时刻联系 **技术支持**。也可以先参考下面列出的问题定位或 **FAQ** 尝试快速解决问题:
**Seafile 是否支持在线文档编辑与预览?**
镜像预装了 OnlyOffice Docs,可以通过配置实现在线文档编辑与预览
### Seafile 使用入门[](https://support.websoft9.com/docs/seafile#seafile-%E4%BD%BF%E7%94%A8%E5%85%A5%E9%97%A8)
下面以 **Seafile 构建企业网盘系统** 作为一个任务,帮助用户快速入门:
### Seafile 常用操作[](https://support.websoft9.com/docs/seafile#seafile-%E5%B8%B8%E7%94%A8%E6%93%8D%E4%BD%9C)
#### 添加文件[](https://support.websoft9.com/docs/seafile#%E6%B7%BB%E5%8A%A0%E6%96%87%E4%BB%B6)
下面我们介绍 Seafile 如何添加和编辑文件:
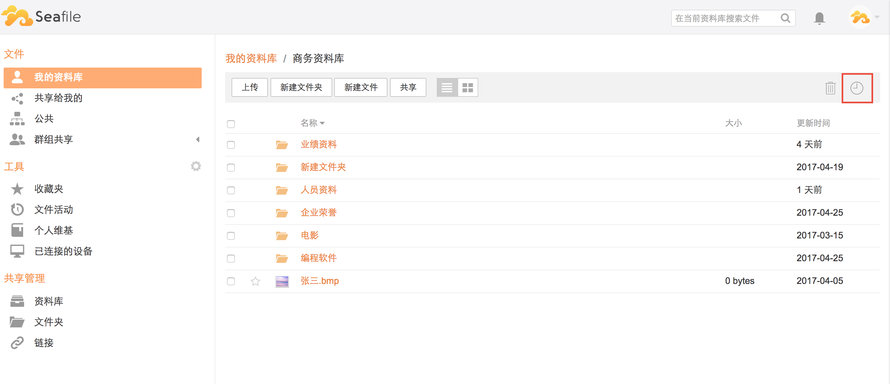
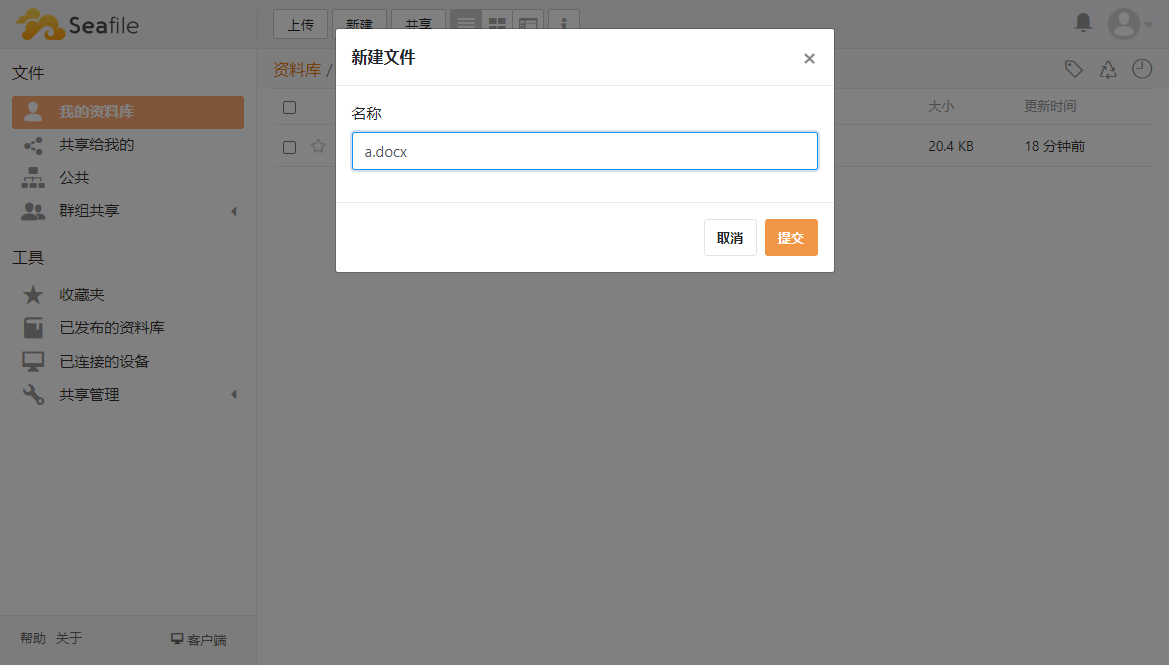
1. 登录到 Seafile 后,添加资料库,然后添加文件
3. 设置(检查) Seafile 的真实主机地址(**必选项,否则无法使用文件上传功能**)
* SERVICE\_URL:**
* FILE\_SERVER\_ROOT:**

4. 开始使用 Seafile 全面友好的功能吧
5. [导入](https://support.websoft9.com/docs/seafile#importlicense)授权文件 (仅 Seafile 企业版需要)
> 需要了解更多Seafile的使用,请参考:《Seafile 用户手册》 和 《Seafile 服务器手册》
#### 出现问题?[](https://support.websoft9.com/docs/seafile#%E5%87%BA%E7%8E%B0%E9%97%AE%E9%A2%98)
若碰到问题,请第一时刻联系 **技术支持**。也可以先参考下面列出的问题定位或 **FAQ** 尝试快速解决问题:
**Seafile 是否支持在线文档编辑与预览?**
镜像预装了 OnlyOffice Docs,可以通过配置实现在线文档编辑与预览
### Seafile 使用入门[](https://support.websoft9.com/docs/seafile#seafile-%E4%BD%BF%E7%94%A8%E5%85%A5%E9%97%A8)
下面以 **Seafile 构建企业网盘系统** 作为一个任务,帮助用户快速入门:
### Seafile 常用操作[](https://support.websoft9.com/docs/seafile#seafile-%E5%B8%B8%E7%94%A8%E6%93%8D%E4%BD%9C)
#### 添加文件[](https://support.websoft9.com/docs/seafile#%E6%B7%BB%E5%8A%A0%E6%96%87%E4%BB%B6)
下面我们介绍 Seafile 如何添加和编辑文件:
1. 登录到 Seafile 后,添加资料库,然后添加文件

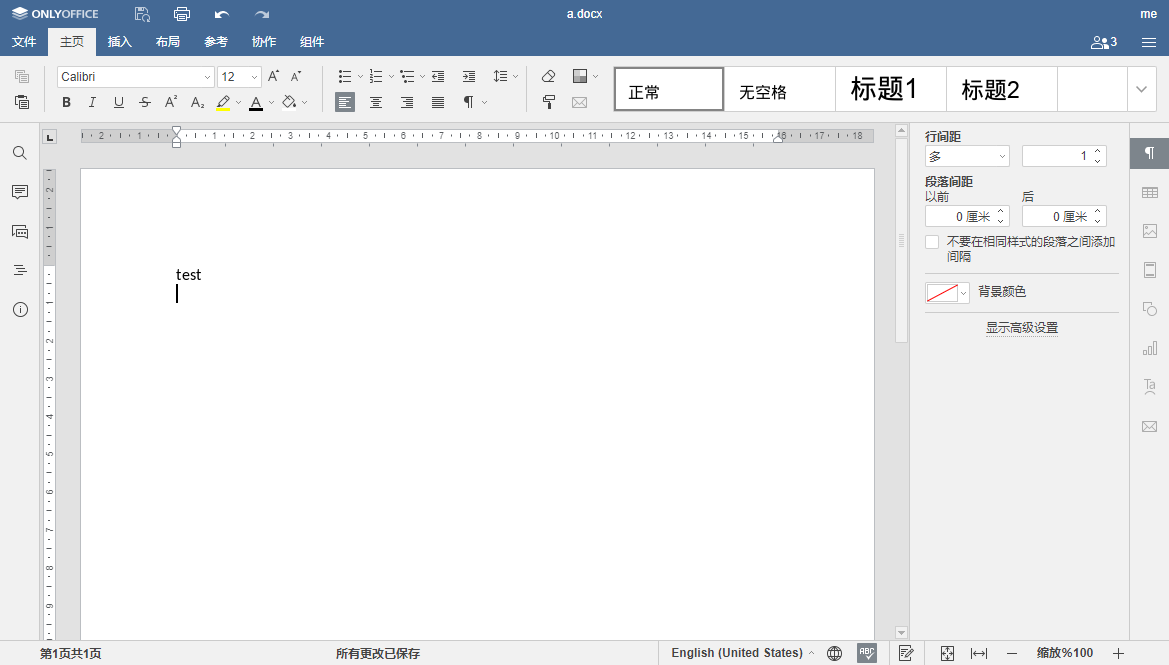
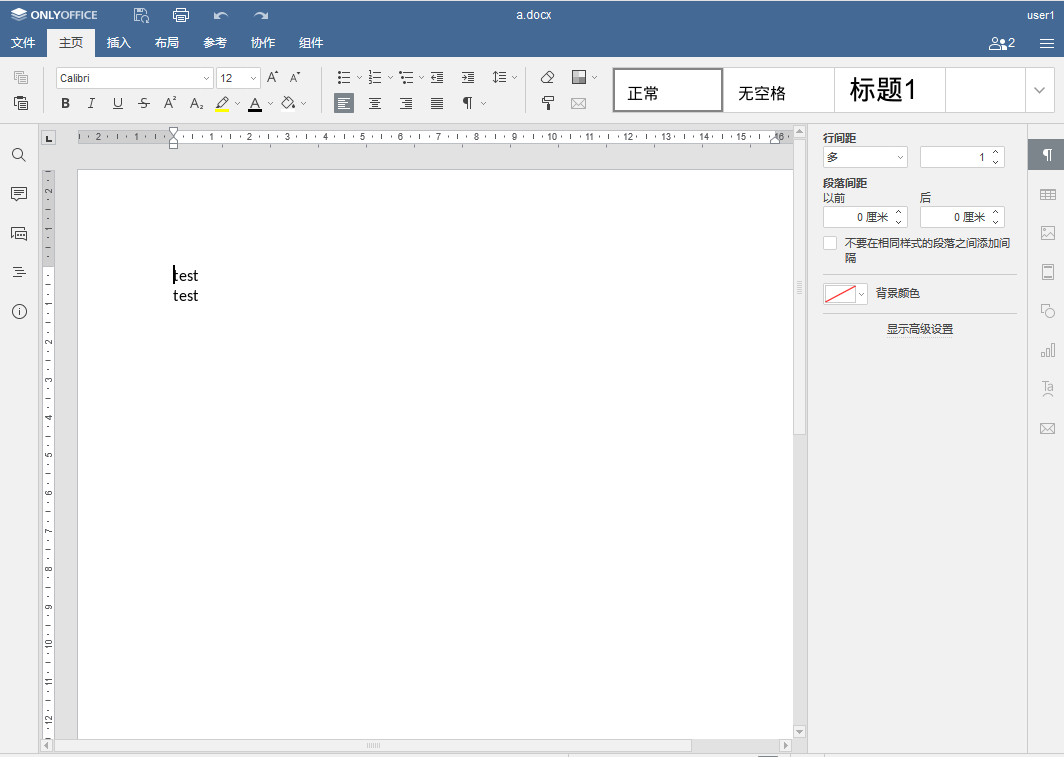
 2. 在线编辑文件(通过内置的 OnlyOffice Docs 服务实现)
#### 用户管理[](https://support.websoft9.com/docs/seafile#%E7%94%A8%E6%88%B7%E7%AE%A1%E7%90%86)
下面我们介绍 Seafile 如何创建用户和群组:
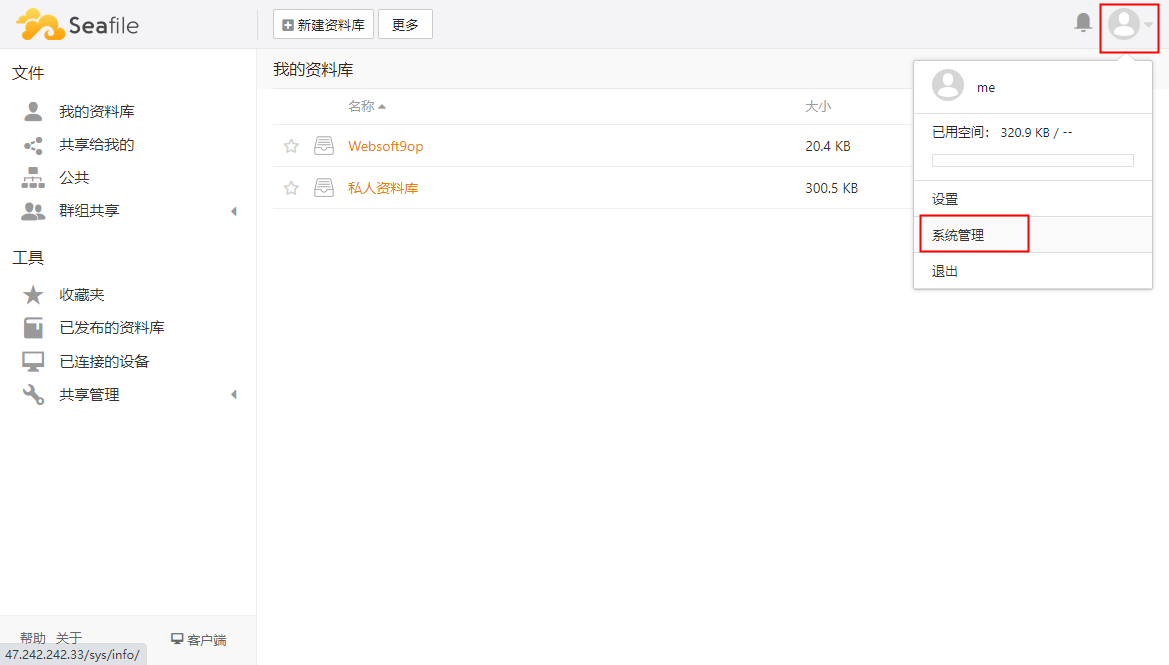
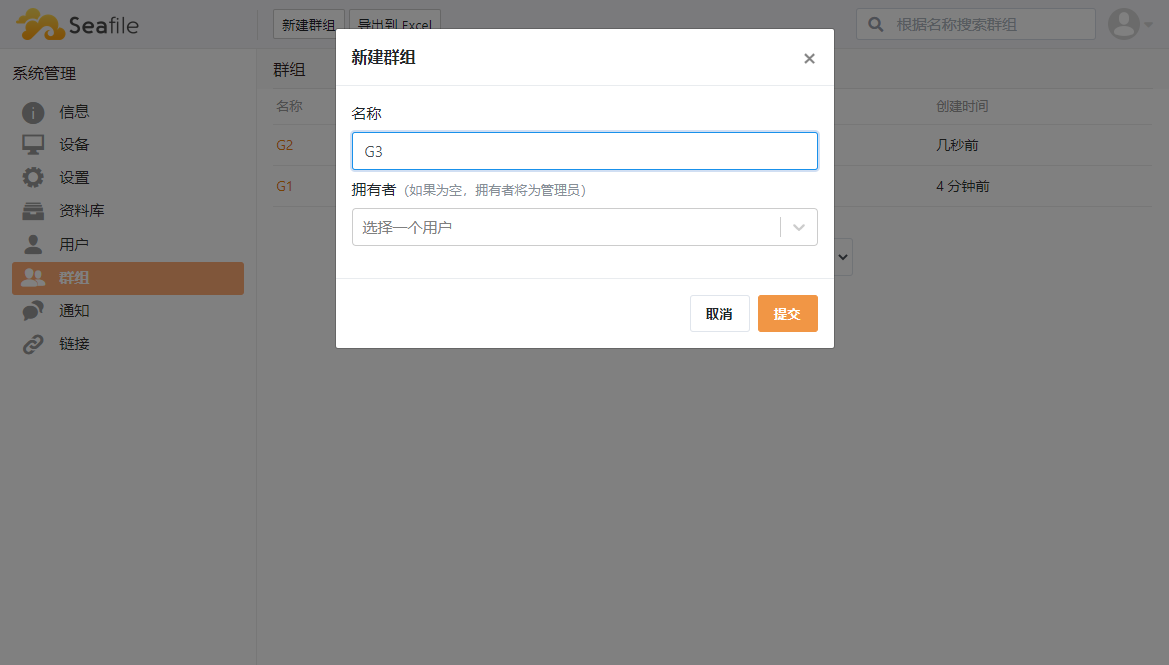
1. 打开右上角用户图标,进入【系统管理】,分别添加【用户】和【群组】
2. 在线编辑文件(通过内置的 OnlyOffice Docs 服务实现)

#### 用户管理[](https://support.websoft9.com/docs/seafile#%E7%94%A8%E6%88%B7%E7%AE%A1%E7%90%86)
下面我们介绍 Seafile 如何创建用户和群组:
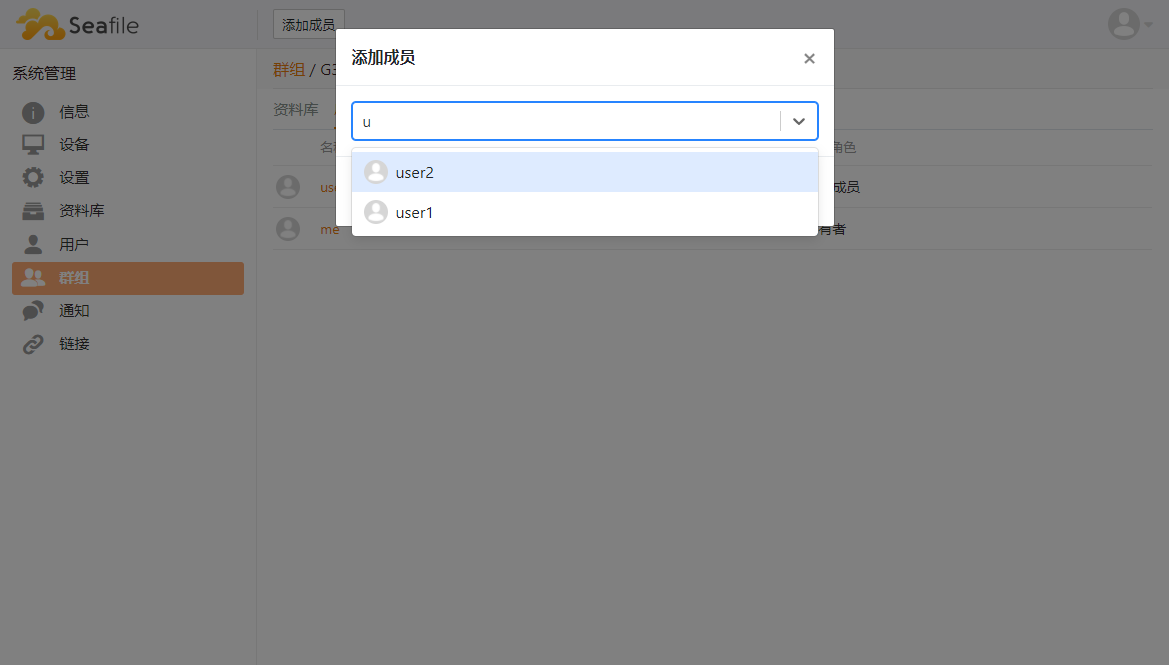
1. 打开右上角用户图标,进入【系统管理】,分别添加【用户】和【群组】


 2. 设置所创建的用户所归属群组
#### 文件共享[](https://support.websoft9.com/docs/seafile#%E6%96%87%E4%BB%B6%E5%85%B1%E4%BA%AB)
下面我们介绍 Seafile 如何给另外一个用户共享自己的文件:
1. 进入【我的资料库】,将资料库共享给指定用户,
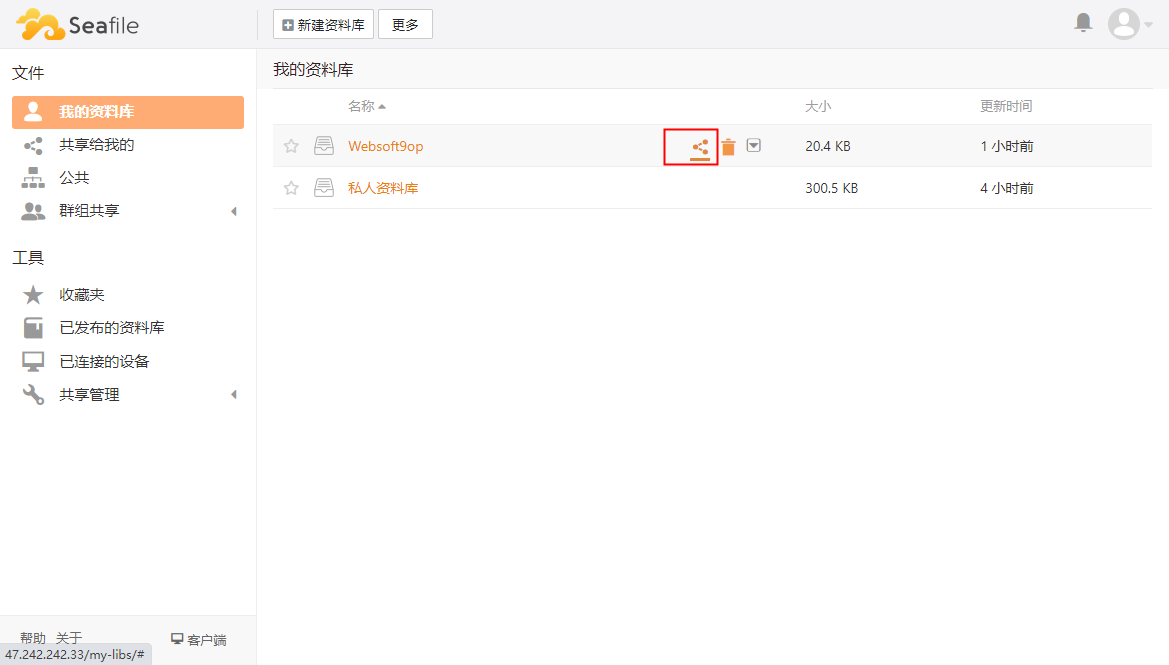
2. 设定权限为【可写】或【只读】
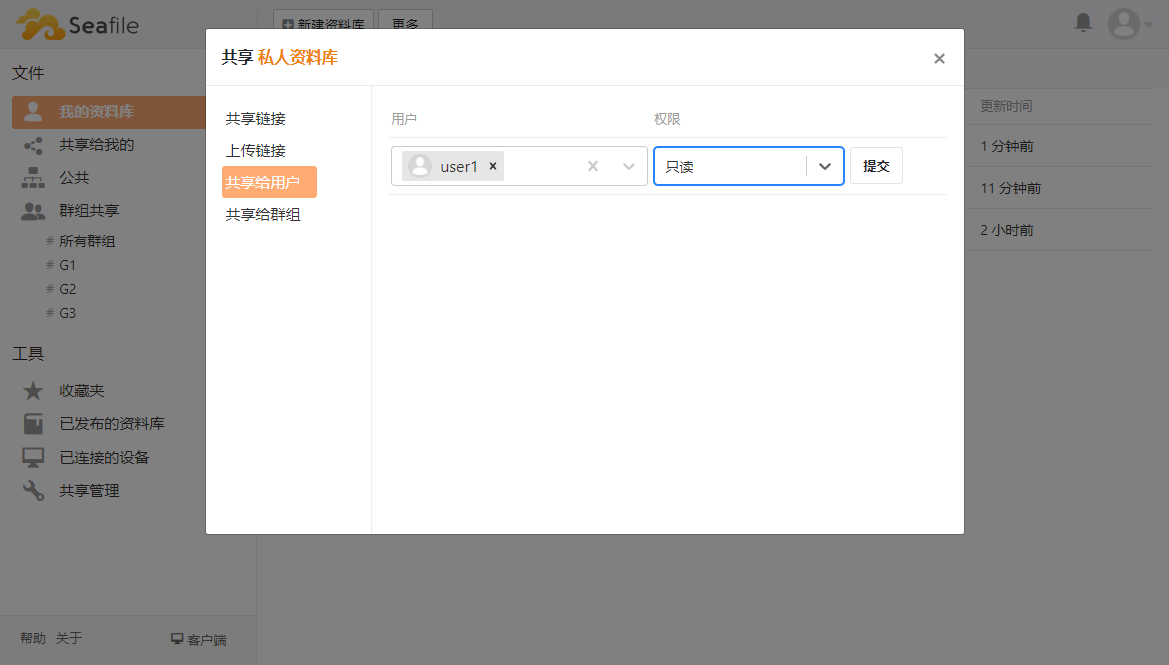
> 在选择用户时,需输入用户名,系统自动查找匹配
#### 读写共享文件[](https://support.websoft9.com/docs/seafile#%E8%AF%BB%E5%86%99%E5%85%B1%E4%BA%AB%E6%96%87%E4%BB%B6)
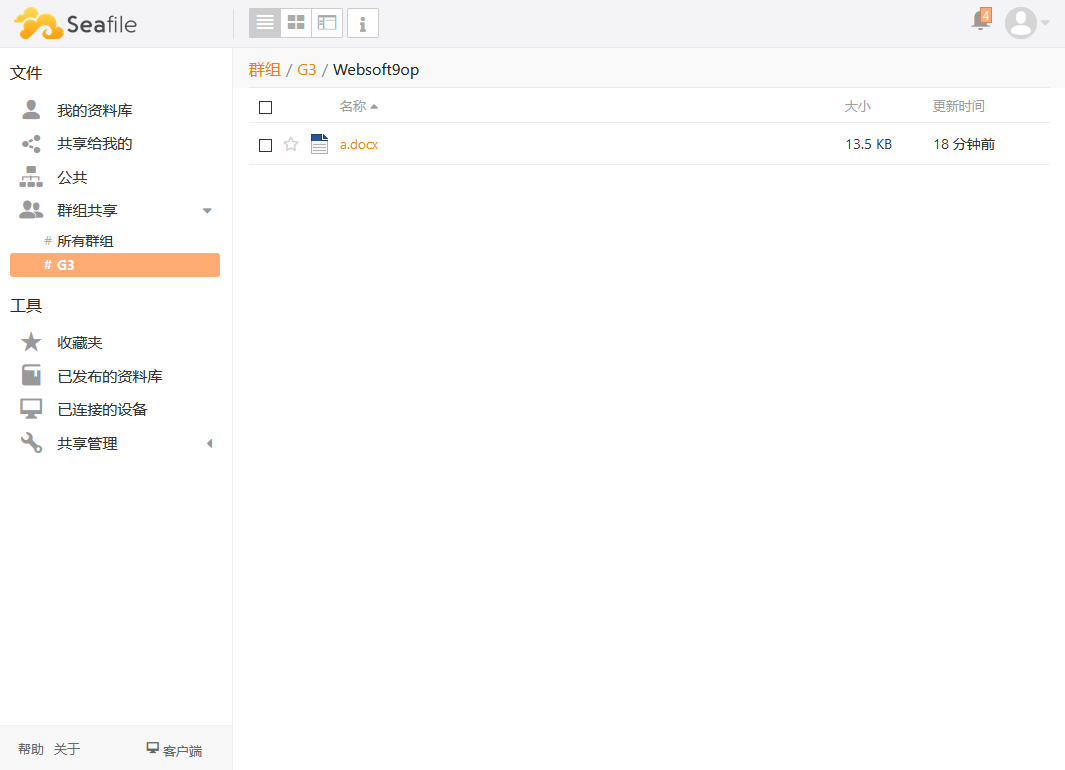
下面我们演示 Seafile 用户如何读写其他人共享过来的文件:
1. 切换user1用户登录,使用邮箱地址作为登录名
2. 设置所创建的用户所归属群组

#### 文件共享[](https://support.websoft9.com/docs/seafile#%E6%96%87%E4%BB%B6%E5%85%B1%E4%BA%AB)
下面我们介绍 Seafile 如何给另外一个用户共享自己的文件:
1. 进入【我的资料库】,将资料库共享给指定用户,

2. 设定权限为【可写】或【只读】

> 在选择用户时,需输入用户名,系统自动查找匹配
#### 读写共享文件[](https://support.websoft9.com/docs/seafile#%E8%AF%BB%E5%86%99%E5%85%B1%E4%BA%AB%E6%96%87%E4%BB%B6)
下面我们演示 Seafile 用户如何读写其他人共享过来的文件:
1. 切换user1用户登录,使用邮箱地址作为登录名
 2. 查看共享文件,进入 OnlyOffice 进行编辑,保存文档
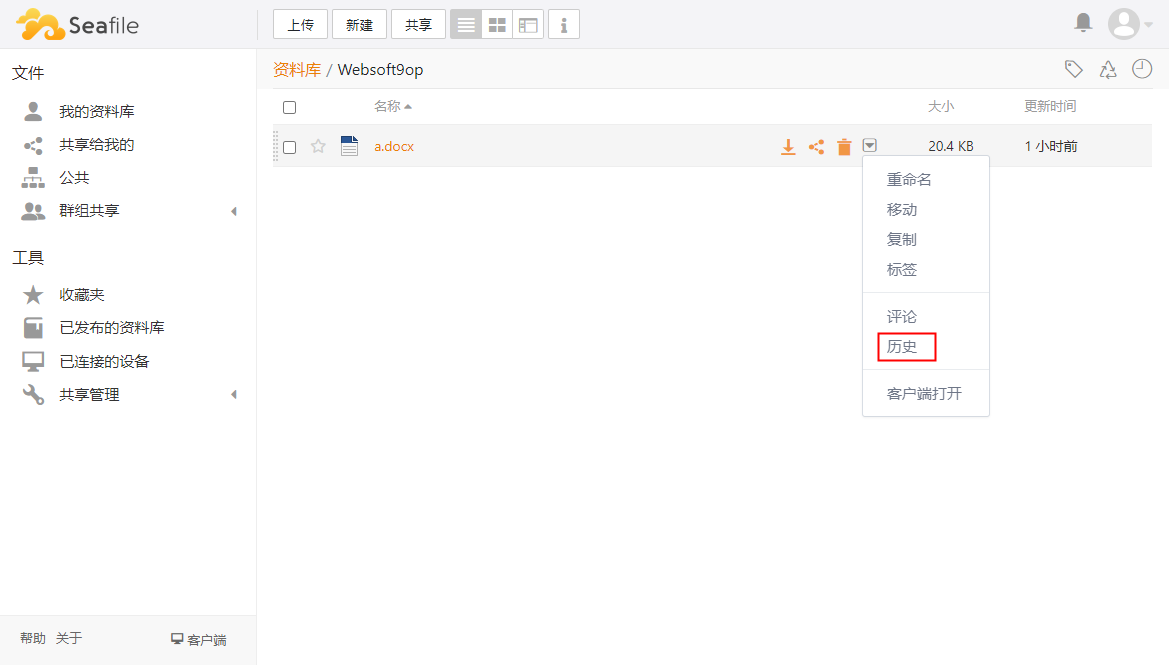
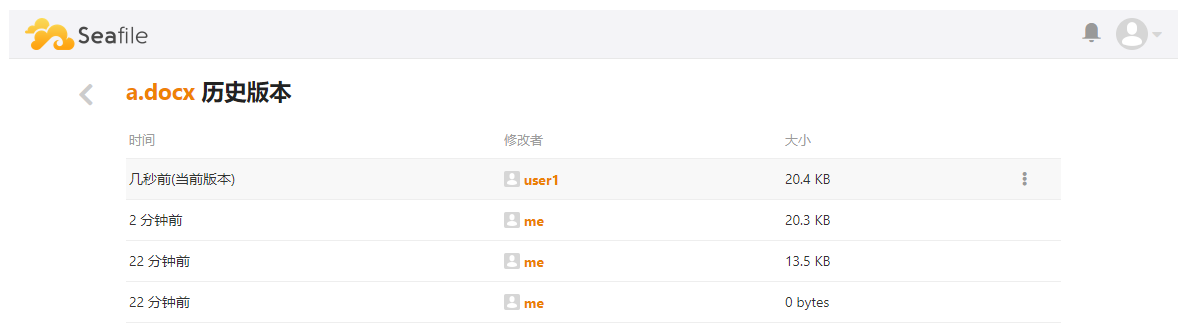
 3. 切换到管理员账号 `me@example.com`,查看共享文件的版本变更信息
 #### 导入企业版 License[](https://support.websoft9.com/docs/seafile#importlicense)
如果您已经向 Seafile 软件商购买了专业版,官方会向您提供授权文件 seafile-license.txt。
通过下面的命令,拷贝授权至 Seafile,即可完成授权文件的安装:
```
cp seafile-license.txt /data/apps/seafile/data/seafile_data
docker restart seafile
```
#### 配置 SMTP[](https://support.websoft9.com/docs/seafile#smtp)
1. 在邮箱管理控制台获取 SMTP 相关参数
2. 使用 SFTP 连接服务器,编辑 Seafile 配置文件 seahub\_settings.py,插入邮箱配置段
```
EMAIL_USE_SSL = True
EMAIL_HOST = 'smtp.163.com'
EMAIL_HOST_USER = 'imdcinsights@163.com'
EMAIL_HOST_PASSWORD = 'Auth_Code' //此密码不是邮箱密码,是需要通过163邮箱后台设置去获取的授权码
EMAIL_PORT = '465'
DEFAULT_FROM_EMAIL = EMAIL_HOST_USER
SERVER_EMAIL = EMAIL_HOST_USER
```
参考官方文档:[发送邮件提醒](https://manual-cn-origin.seafile.com/config/sending_email)
3. 重启 Seafile 容器服务
```
sudo docker restart seafile
```
#### 修改邮件通知签名[](https://support.websoft9.com/docs/seafile#%E4%BF%AE%E6%94%B9%E9%82%AE%E4%BB%B6%E9%80%9A%E7%9F%A5%E7%AD%BE%E5%90%8D)
在[邮件模板](https://manual-cn-origin.seafile.com/config/customize_email_notifications)文件中 "Seafile 团队" 实际上对应后台的【site\_name】字段。所以,如果想将邮件通知中默认签名 "Seafile 团队" 修改成自己的签名,方案如下:
登录到 Seafile 修改网站名称即可:
#### 导入企业版 License[](https://support.websoft9.com/docs/seafile#importlicense)
如果您已经向 Seafile 软件商购买了专业版,官方会向您提供授权文件 seafile-license.txt。
通过下面的命令,拷贝授权至 Seafile,即可完成授权文件的安装:
```
cp seafile-license.txt /data/apps/seafile/data/seafile_data
docker restart seafile
```
#### 配置 SMTP[](https://support.websoft9.com/docs/seafile#smtp)
1. 在邮箱管理控制台获取 SMTP 相关参数
2. 使用 SFTP 连接服务器,编辑 Seafile 配置文件 seahub\_settings.py,插入邮箱配置段
```
EMAIL_USE_SSL = True
EMAIL_HOST = 'smtp.163.com'
EMAIL_HOST_USER = 'imdcinsights@163.com'
EMAIL_HOST_PASSWORD = 'Auth_Code' //此密码不是邮箱密码,是需要通过163邮箱后台设置去获取的授权码
EMAIL_PORT = '465'
DEFAULT_FROM_EMAIL = EMAIL_HOST_USER
SERVER_EMAIL = EMAIL_HOST_USER
```
参考官方文档:[发送邮件提醒](https://manual-cn-origin.seafile.com/config/sending_email)
3. 重启 Seafile 容器服务
```
sudo docker restart seafile
```
#### 修改邮件通知签名[](https://support.websoft9.com/docs/seafile#%E4%BF%AE%E6%94%B9%E9%82%AE%E4%BB%B6%E9%80%9A%E7%9F%A5%E7%AD%BE%E5%90%8D)
在[邮件模板](https://manual-cn-origin.seafile.com/config/customize_email_notifications)文件中 "Seafile 团队" 实际上对应后台的【site\_name】字段。所以,如果想将邮件通知中默认签名 "Seafile 团队" 修改成自己的签名,方案如下:
登录到 Seafile 修改网站名称即可:
 #### Seafile 文档预览与编辑[](https://support.websoft9.com/docs/seafile#seafile-%E6%96%87%E6%A1%A3%E9%A2%84%E8%A7%88%E4%B8%8E%E7%BC%96%E8%BE%91)
参考:Seafile 连接 ONLYOFFICE docs
#### 域名额外配置(修改 URL)[](https://support.websoft9.com/docs/seafile#dns)
**域名五步设置** 完成后,需设置 Seafile 的 URL:
登录 Seafile 后台,修改主机地址。必须修改,否则文件无法正常上传、下载。
#### Seafile 文档预览与编辑[](https://support.websoft9.com/docs/seafile#seafile-%E6%96%87%E6%A1%A3%E9%A2%84%E8%A7%88%E4%B8%8E%E7%BC%96%E8%BE%91)
参考:Seafile 连接 ONLYOFFICE docs
#### 域名额外配置(修改 URL)[](https://support.websoft9.com/docs/seafile#dns)
**域名五步设置** 完成后,需设置 Seafile 的 URL:
登录 Seafile 后台,修改主机地址。必须修改,否则文件无法正常上传、下载。
 #### 配置 HTTPS[](https://support.websoft9.com/docs/seafile#https)
下面是对 Seafile 官方文档:向Let's encrypt申请SSL证书 的实践解读,验证可用:
**前置条件**
1. 在云控制台开启 **TCP:443** 端口
2. 完成域名解析,确保 Seafile 可以通过域名访问
**基本设置**
Seafile 默认支持 Let's Encrypt 免费证书自动部署方案,只需如下几步设置:
1. 参考网久软件提供Let's Encrypt 自动配置 HTTPS 方案,完成证书申请及配置等操作
2. 登录 Seafile 后台,修改主机地址
3. HTTPS 设置成功
#### 管理员密码[](https://support.websoft9.com/docs/seafile#%E7%AE%A1%E7%90%86%E5%91%98%E5%AF%86%E7%A0%81)
实际工作中,我们可能会 **修改** 或 **找回** Seafile 管理员密码
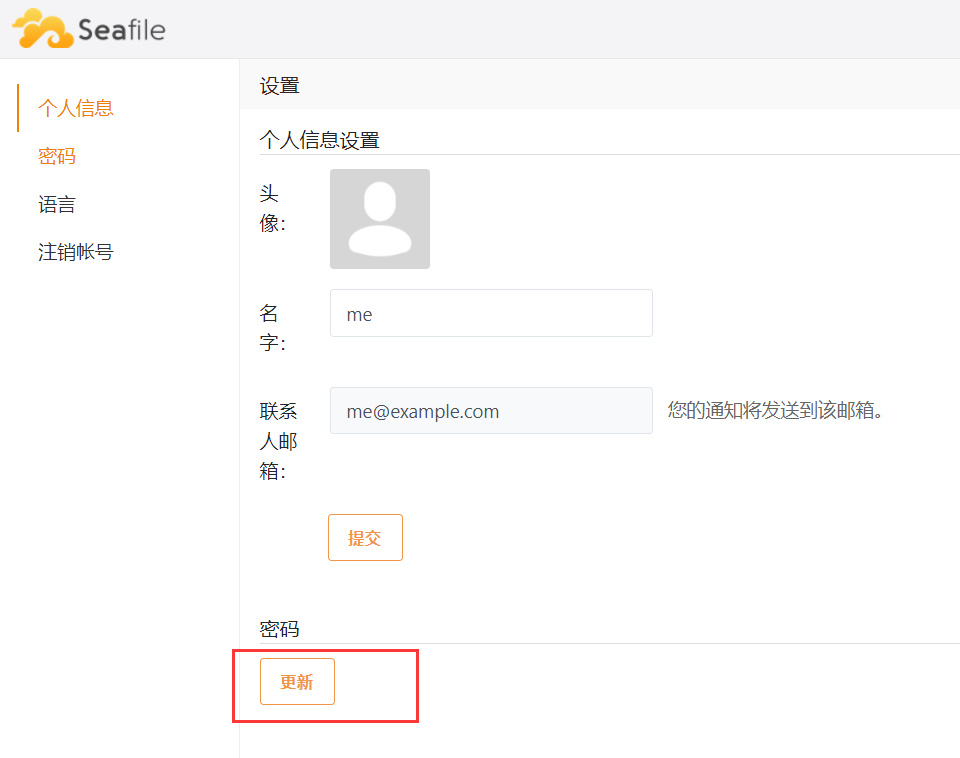
**修改密码**[****](https://support.websoft9.com/docs/seafile#%E4%BF%AE%E6%94%B9%E5%AF%86%E7%A0%81)
1. 以管理员账号登录后台
2. 依次打开:【设置】>【更新】,编辑需要修改密码的账号
3. 修改密码后提交,退出后新密码生效
#### 配置 HTTPS[](https://support.websoft9.com/docs/seafile#https)
下面是对 Seafile 官方文档:向Let's encrypt申请SSL证书 的实践解读,验证可用:
**前置条件**
1. 在云控制台开启 **TCP:443** 端口
2. 完成域名解析,确保 Seafile 可以通过域名访问
**基本设置**
Seafile 默认支持 Let's Encrypt 免费证书自动部署方案,只需如下几步设置:
1. 参考网久软件提供Let's Encrypt 自动配置 HTTPS 方案,完成证书申请及配置等操作
2. 登录 Seafile 后台,修改主机地址
3. HTTPS 设置成功
#### 管理员密码[](https://support.websoft9.com/docs/seafile#%E7%AE%A1%E7%90%86%E5%91%98%E5%AF%86%E7%A0%81)
实际工作中,我们可能会 **修改** 或 **找回** Seafile 管理员密码
**修改密码**[****](https://support.websoft9.com/docs/seafile#%E4%BF%AE%E6%94%B9%E5%AF%86%E7%A0%81)
1. 以管理员账号登录后台
2. 依次打开:【设置】>【更新】,编辑需要修改密码的账号
3. 修改密码后提交,退出后新密码生效
 **找回密码**[****](https://support.websoft9.com/docs/seafile#%E6%89%BE%E5%9B%9E%E5%AF%86%E7%A0%81)
若不记得 Seafile 管理员密码,可以通过如下两个方式找回
方案一:通过邮件找回密码
Seafile可以通过发送邮件找回密码,但前提条件是您的 Seafile 已经配置好SMTP
**找回密码**[****](https://support.websoft9.com/docs/seafile#%E6%89%BE%E5%9B%9E%E5%AF%86%E7%A0%81)
若不记得 Seafile 管理员密码,可以通过如下两个方式找回
方案一:通过邮件找回密码
Seafile可以通过发送邮件找回密码,但前提条件是您的 Seafile 已经配置好SMTP
 方案二:修改数据库中的密码字段
如果不能发邮件,请登录数据库管理面板 phpMyAdmin 进行修改
1. 登录 phpMyAdmin,并找到你的网站数据库下的 *EmailUser* 表,编辑管理员用户(下图以用户名 `me.example.com`为例)
方案二:修改数据库中的密码字段
如果不能发邮件,请登录数据库管理面板 phpMyAdmin 进行修改
1. 登录 phpMyAdmin,并找到你的网站数据库下的 *EmailUser* 表,编辑管理员用户(下图以用户名 `me.example.com`为例)
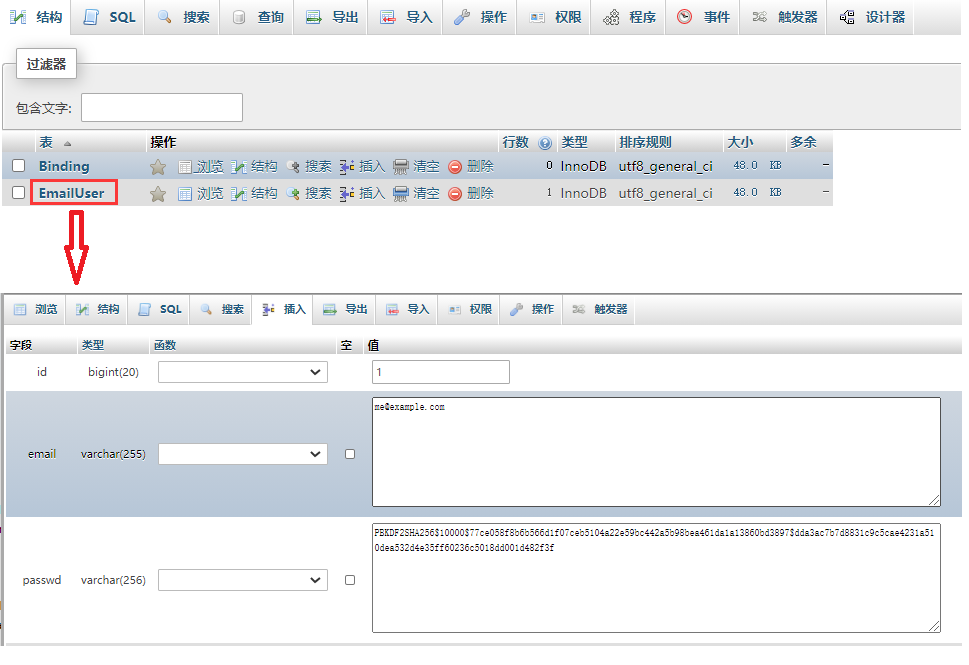 2. 截图的地方数据库密码(加密后的密文),用`PBKDF2SHA256$10000$7289a20ae4fc2329415b0645fa3d106019cc61952ae1bc2f9eeef7b30dc47d88$5418ac28f06bd84f2bb701a10dbea6b0bd30676c8042e1f73b9ce12aac302a8d`替换之
3. 点击【执行】
4. 新的密码为`123456`
#### 使用客户端[](https://support.websoft9.com/docs/seafile#client)
1. 到官网下载客户端
2. 获取客户端登录 SERVICE\_URL :登录到 Seafile 后台,点击右上方个人头像,进入【系统设置】获取 SERVICE\_URL

3. 在手机上打开 Seafile 客户端,输入上面获取的 SERVICE\_URL 和账号,点击登录
2. 截图的地方数据库密码(加密后的密文),用`PBKDF2SHA256$10000$7289a20ae4fc2329415b0645fa3d106019cc61952ae1bc2f9eeef7b30dc47d88$5418ac28f06bd84f2bb701a10dbea6b0bd30676c8042e1f73b9ce12aac302a8d`替换之
3. 点击【执行】
4. 新的密码为`123456`
#### 使用客户端[](https://support.websoft9.com/docs/seafile#client)
1. 到官网下载客户端
2. 获取客户端登录 SERVICE\_URL :登录到 Seafile 后台,点击右上方个人头像,进入【系统设置】获取 SERVICE\_URL

3. 在手机上打开 Seafile 客户端,输入上面获取的 SERVICE\_URL 和账号,点击登录
 4. 客户端主界面
 ### 参数[](https://support.websoft9.com/docs/seafile#parameter)
Seafile 应用中包含 Nginx, Docker, MySQL, phpMyAdmin, ONLYOFFICE docs, ElasticSearch 等组件,可通过 **通用参数表** 查看路径、服务、端口等参数。
通过运行`docker ps`,可以查看到 Seafile 运行时所有的 Container:
```
CONTAINER ID IMAGE COMMAND CREATED STATUS PORTS NAMES
824cc16f7950 phpmyadmin:latest "/docker-entrypoint.…" 3 hours ago Up 3 hours 0.0.0.0:9090->80/tcp, :::9090->80/tcp phpmyadmin
fb9c795d5cef seafileltd/seafile-mc:latest "/sbin/my_init -- /s…" 3 hours ago Up 3 hours 0.0.0.0:9001->80/tcp, :::9001->80/tcp seafile
e237c52ccadd mariadb:10.5 "docker-entrypoint.s…" 3 hours ago Up 3 hours 0.0.0.0:3306->3306/tcp, :::3306->3306/tcp seafile-db
ffd4eae50a9c memcached:1.5.6 "memcached -m 256" 3 hours ago Up 3 hours 11211/tcp seafile-memcached
```
#### 路径[](https://support.websoft9.com/docs/seafile#path)
Seafile 安装目录: */data/apps/seafile*\
Seafile 应用目录: */data/apps/seafile/data/seafile\_data*\
Seafile 日志目录:*/data/apps/seafile/data/seafile\_data/logs*\
Seafile 配置目录:*/data/apps/seafile/data/seafile\_data/seafile/conf*
> Seafile 配置文件包括 seahub\_settings.py, seafile.conf等
#### 端口[](https://support.websoft9.com/docs/seafile#port)
| 端口号 | 用途 | 必要性 |
| ---- | ----------------------------------- | --- |
| 9002 | 通过 http访问 OnlyOffice Docs on Docker | 可选 |
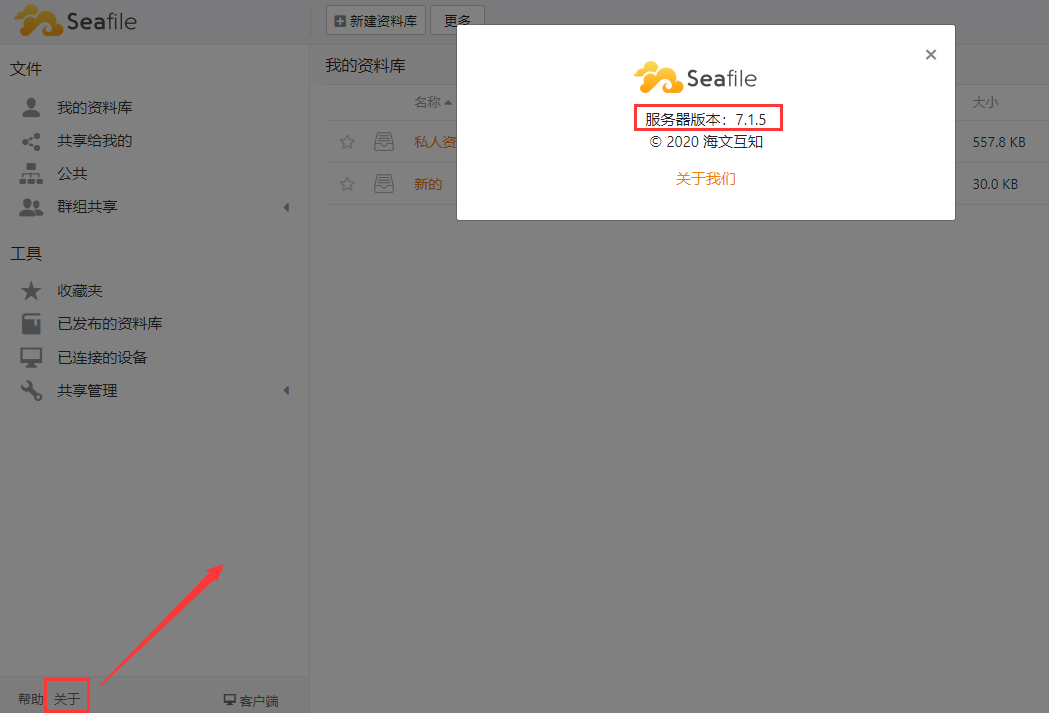
#### 版本[](https://support.websoft9.com/docs/seafile#version)
Seafile 控制台查看
#### 服务[](https://support.websoft9.com/docs/seafile#service)
```
sudo docker start | stop | restart seafile
sudo docker start | stop | restart seafile-db
sudo docker start | stop | restart seafile-memcached
```
#### 命令行[](https://support.websoft9.com/docs/seafile#cli)
[Seafile client for a Cli server](https://help.seafile.com/syncing_client/linux-cli/)
#### API[](https://support.websoft9.com/docs/seafile#api)
[Web AP](https://manual.seafile.com/develop/web_api_v2.1/)
---
# Agent Instructions
This documentation is published with GitBook. GitBook is the documentation platform designed so that both humans and AI agents can read, navigate, and reason over technical content effectively. Learn more at gitbook.com.
## Querying This Documentation
If you need additional information that is not directly available in this page, you can query the documentation dynamically by asking a question.
Perform an HTTP GET request on the current page URL with the `ask` query parameter, and the optional `goal` query parameter:
```
GET https://docs.imdcinsights.com/ying-yong-zhong-xin/xie-zuo-yu-sheng-chan-li/seafile-kuai-su-ru-men.md?ask=&goal=
```
`ask` is the immediate question: it should be specific, self-contained, and written in natural language.
`goal` is optional and describes the broader end goal you are ultimately trying to accomplish on behalf of the user. GitBook uses it to tailor the answer towards what is most useful for that goal.
The response will contain a direct answer to the question and relevant excerpts and sources from the documentation.
Use this mechanism when the answer is not explicitly present in the current page, you need clarification or additional context, or you want to retrieve related documentation sections.
### 参数[](https://support.websoft9.com/docs/seafile#parameter)
Seafile 应用中包含 Nginx, Docker, MySQL, phpMyAdmin, ONLYOFFICE docs, ElasticSearch 等组件,可通过 **通用参数表** 查看路径、服务、端口等参数。
通过运行`docker ps`,可以查看到 Seafile 运行时所有的 Container:
```
CONTAINER ID IMAGE COMMAND CREATED STATUS PORTS NAMES
824cc16f7950 phpmyadmin:latest "/docker-entrypoint.…" 3 hours ago Up 3 hours 0.0.0.0:9090->80/tcp, :::9090->80/tcp phpmyadmin
fb9c795d5cef seafileltd/seafile-mc:latest "/sbin/my_init -- /s…" 3 hours ago Up 3 hours 0.0.0.0:9001->80/tcp, :::9001->80/tcp seafile
e237c52ccadd mariadb:10.5 "docker-entrypoint.s…" 3 hours ago Up 3 hours 0.0.0.0:3306->3306/tcp, :::3306->3306/tcp seafile-db
ffd4eae50a9c memcached:1.5.6 "memcached -m 256" 3 hours ago Up 3 hours 11211/tcp seafile-memcached
```
#### 路径[](https://support.websoft9.com/docs/seafile#path)
Seafile 安装目录: */data/apps/seafile*\
Seafile 应用目录: */data/apps/seafile/data/seafile\_data*\
Seafile 日志目录:*/data/apps/seafile/data/seafile\_data/logs*\
Seafile 配置目录:*/data/apps/seafile/data/seafile\_data/seafile/conf*
> Seafile 配置文件包括 seahub\_settings.py, seafile.conf等
#### 端口[](https://support.websoft9.com/docs/seafile#port)
| 端口号 | 用途 | 必要性 |
| ---- | ----------------------------------- | --- |
| 9002 | 通过 http访问 OnlyOffice Docs on Docker | 可选 |
#### 版本[](https://support.websoft9.com/docs/seafile#version)
Seafile 控制台查看

#### 服务[](https://support.websoft9.com/docs/seafile#service)
```
sudo docker start | stop | restart seafile
sudo docker start | stop | restart seafile-db
sudo docker start | stop | restart seafile-memcached
```
#### 命令行[](https://support.websoft9.com/docs/seafile#cli)
[Seafile client for a Cli server](https://help.seafile.com/syncing_client/linux-cli/)
#### API[](https://support.websoft9.com/docs/seafile#api)
[Web AP](https://manual.seafile.com/develop/web_api_v2.1/)
---
# Agent Instructions
This documentation is published with GitBook. GitBook is the documentation platform designed so that both humans and AI agents can read, navigate, and reason over technical content effectively. Learn more at gitbook.com.
## Querying This Documentation
If you need additional information that is not directly available in this page, you can query the documentation dynamically by asking a question.
Perform an HTTP GET request on the current page URL with the `ask` query parameter, and the optional `goal` query parameter:
```
GET https://docs.imdcinsights.com/ying-yong-zhong-xin/xie-zuo-yu-sheng-chan-li/seafile-kuai-su-ru-men.md?ask=&goal=
```
`ask` is the immediate question: it should be specific, self-contained, and written in natural language.
`goal` is optional and describes the broader end goal you are ultimately trying to accomplish on behalf of the user. GitBook uses it to tailor the answer towards what is most useful for that goal.
The response will contain a direct answer to the question and relevant excerpts and sources from the documentation.
Use this mechanism when the answer is not explicitly present in the current page, you need clarification or additional context, or you want to retrieve related documentation sections.